This is part 5 of my IoT series of blogs. So far we did look at the following topic
- Introduction into the planned scenario
- Building a Raspberry Pi based Smart Gateway
- ESP8266 and DHT22 based smart sensor
- Putting the Smart into the Smart IoT Device
- Setting up an “all in one” demo environment
This post will take a closer look of the content of the Smart Gateway and will give more information on the what and how.
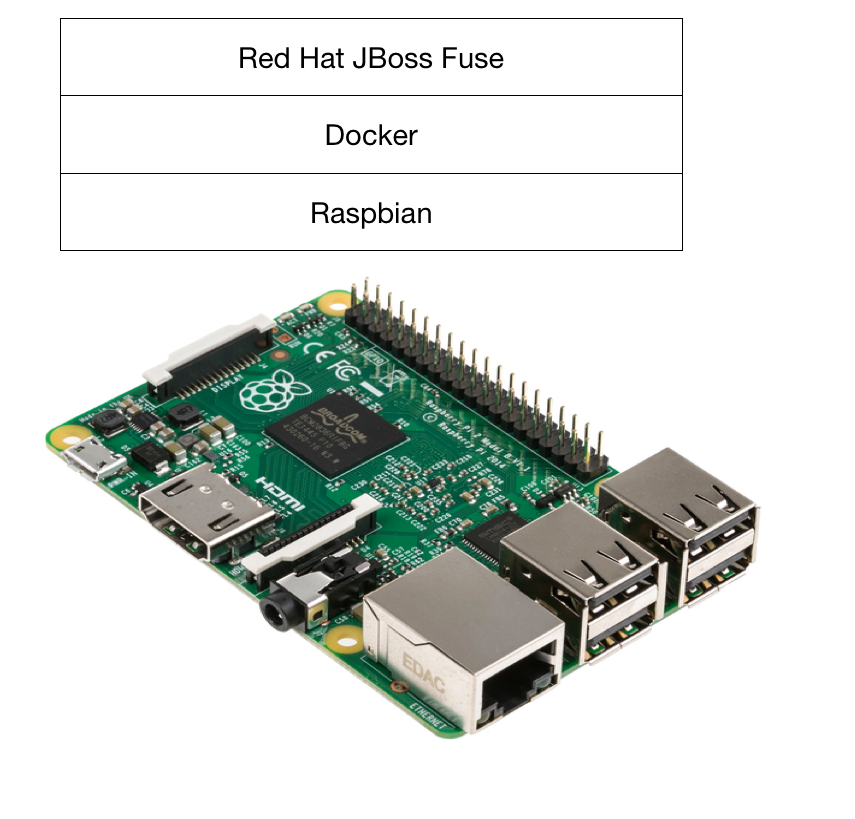
From a building block perspective, the Smart Gateway consists of the following elements

- Raspbian as the OS running on the Raspberry Pi
- Docker to contain and separate the various functionalities running on the Gateway
- Red Hat JBoss Fuse as the “smart” part of the Gateway, being responsible for
- providing the MQTT Broker for the sensors
- transforming messages from native to a generic XML format
- content based routing of messages to their designated targets
As the previous blogs explained how to setup the Smart Gateway, this one will look into the implementation details, being
- receiving a CSV based message via MQTT
- transforming the CVS to XML and enhancing it with Meta-Data from the MQTT Topic
- forwarding the transformed message via JMS to the “Datacenter” for further processing
Overview
The logic of the Smart Gateway is build using a Apache Camel route in Spring XML.

There are many ways of doing this, like
- running the Camel route in a standalone Java application
- deploying the Camel route as a feature/bundle on JBoss Fuse
- deploying the Camel route as a bundle on JBoss EAP
I have decided to use the JBoss Fuse based option, as I needed the Message-Broker from JBoss Fuse anyhow and also wanted to make use of the management and monitoring capabilities of JBoss Fuse.
The complete sourcecode of the Smart Gateway can be copied from my Github repository.
The Route
The Camel route is, based on the things our Gateway needs to do, rather simple
[code]
<route>
<from uri="mqtt:mqtt.temp.receiver?host=tcp://localhost:1883&amp;subscribeTopicNames=iotdemo/#/#&amp;userName=admin&amp;password=change12_me"/>
<bean ref="myHelper" method="enhanceMessage" beanType="com.redhat.demo.smart_gateway.MyHelper"/>
<unmarshal ref="bindyDataFormat"/>
<convertBodyTo type="java.lang.String"/>
<to uri="activemqDatacener:queue:message.to.rules_cep"/>
</route>
[/code]
Let’s analyse the relevant lines of this fragment, starting with the receiving part
[code]
<from uri="mqtt:mqtt.temp.receiver?host=tcp://localhost:1883&amp;subscribeTopicNames=iotdemo/#/#&amp;userName=admin&amp;password=change12_me"/>
[/code]
This code uses the mqtt component of Apache Camel and listens on the topic ‘iotdemo/#/#’ for incoming messages. The ‘#’ are wildcards, enabling the Gateway to receive messages on any topics conforming to this naming convention.
In our case the first ‘#’ stands for the type of sensor ( e.g. temperature, humidity ) and the second one for the unique id of the sensor/device.
[code]
<bean ref="myHelper" method="enhanceMessage" beanType="com.redhat.demo.smart_gateway.MyHelper">
[/code]
The received message and all it’s Meta-Data is forwarded to a custom Java Bean for processing. In this case it will take the CSV value from the payload of the MQTT-Message and extend it with details from the name of the MQTT-Topic on which it was received.
We will take a look at this bean later on in this post.
[code]
<unmarshal ref="bindyDataFormat"/>
[/code]
Now that our helper bean has extended the CVS value with all relevant information, we can use the Apache Camel bindy component to unmarshal the CSV value to XML.
[code]
<convertBodyTo type="java.lang.String"/>
[/code]
To be on the safe/flexible side for further receipients of the message, I found it the most simple way to transform the XML based message to a String.
[code]
<to uri="activemqDatacener:queue:message.to.rules_cep"/>
[/code]
In the last step of the Camel route, we forward the message to a Messagebroker on a remote system.
The Helper Java Bean
As always with creating code, there are many ways to implement the same results.
For the task to extend the payload of an Apache Camel message with information from it’s meta data, I decided to create a Java Bean and use it in my Camel route. The reasons for this where
- I knew how to do that
- demonstrate how to use custom beans in Apache Camel
The relevant part of the Java Bean is
[code language=”java”]
public class MyHelper {
@Handler
public String enhanceMessage( String body, Exchange exchange ) {
String res = null;
res = addDeviceID(body, exchange);
res = addDeviceType(res, exchange);
res = appendTimestamp(res, exchange);
return res;
}
[/code]
All member functions of any class annotated with ‘@Handler’ can be used within a Camel Route.
Camel will call those Handler and hand over the ‘body’ of the message and the ‘Exchange‘ , holding the information during the entire routing of a Message.
Within the custom function you can do whatever Java permits you to do with the message, it’s meta data, etc.
Summary
I’m well aware that this is a rather simple setup, but it very neatly shows the idea and concept of how one could implement a Smart Gateway.
For the full documentation of how to build and run the Smart Gateway, please take a look at the other postings of this series
- Introduction into the planned scenario
- Building a Raspberry Pi based Smart Gateway
- ESP8266 and DHT22 based smart sensor
- Putting the Smart into the Smart IoT Device
- Setting up an “all in one” demo environment
2 replies on “Implementation of SmartGateway for IoT Demo”
[…] IoT Gateway expects the payload for sensor readings to be a csv message with the reading and a count. Our […]
[…] Unfortunately this present was connected with the request to get it running with my Intel Edison and the Smart Gateway. […]