This is Part III of our 4-part blog series about leveraging OpenShift for your containerized application. Part 1 has already been published, and Part II will follow soon. We are flipping it around a little, so stay tuned for Part II, which will be all about development with and on Kubernetes.
- Run: Get your Angular, Python or Java Dockerfile ready with Red Hat’s Universal Base Image and deploy with Helm on OpenShift
- Develop: The Inner Loop with OpenShift Dev Spaces
- Build: From upstream Tekton and ArgoCD to OpenShift Pipelines and GitOps
- Deliver: Publish your own Operator with Operator Lifecycle Manager and the OpenShift Operator Catalog
Build: From upstream Tekton and ArgoCD to OpenShift Pipelines and GitOps
In Part I we’ve introduced our sample application “the Local News Application”, and showed how to deploy it via Helm and the Red Hat Universal Base Image (UBI). We urge you to read it first (if you haven’t so far) because otherwise you miss out on the context! 🙂
Additionally, in Part I we fixed some security issues and standardized on the UBI, but at the end of the article we discovered, that based on an advanced security analysis there were still some issues to fix. And with CVEs popping up regularly, we need automation to roll out our changes regularly to update the base image, our own dependencies and, of course, new features. So, we need our CI/CD on OpenShift.
Remember – the assumption for this blog is that we have our application and the lifecycle components such as Helm Charts, CI/CD Pipelines, Custom Resources for simplified management and even a Kubernetes Operator already built, purely with upstream Open Source projects and now consider moving to OpenShift to find out how it helps us to get faster and more secure, and to rely on enterprise support.
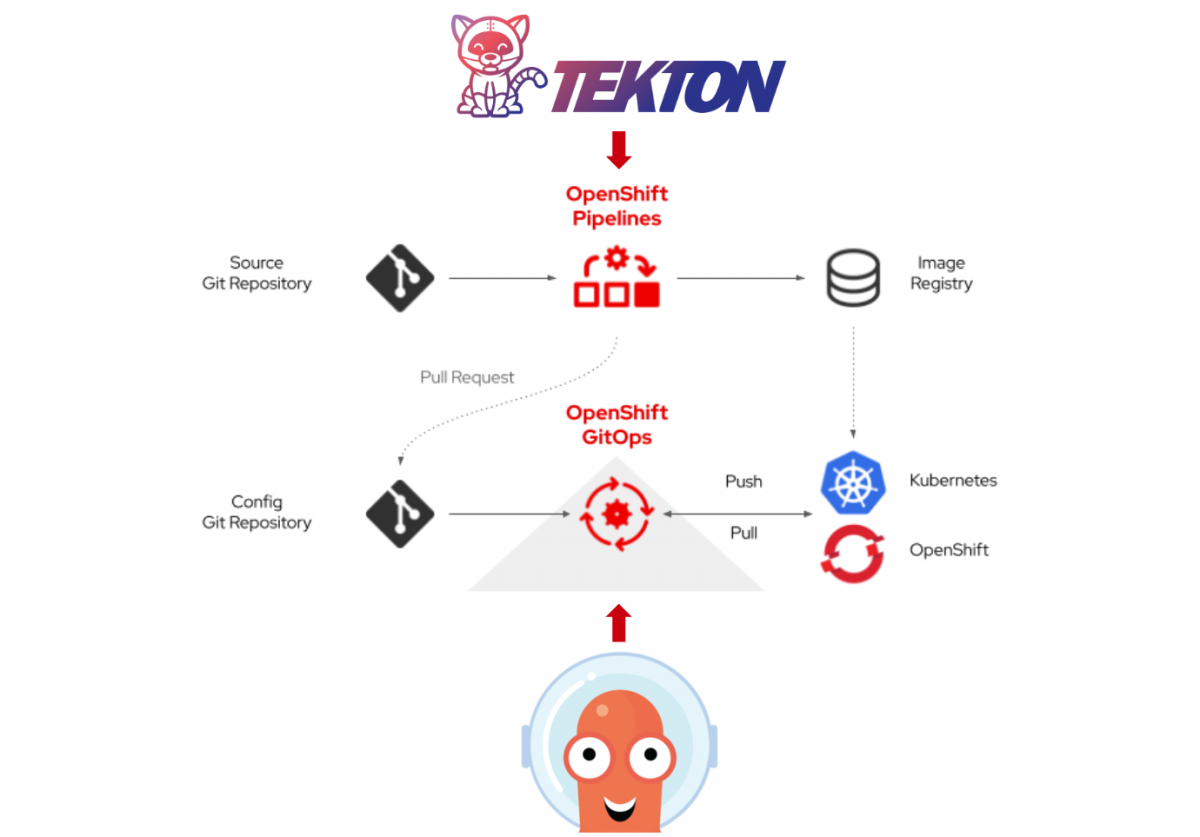
So this part now is all about Continuous Build and Delivery and how to integrate your Pipelines with GitOps on OpenShift.
Therefore, let us assume you are familiar with upstream Tekton and ArgoCD. If you are actually not – don’t worry, you’ll learn about it here, even though it may happen that you have to look up one thing or the other. Either way, suppose you have built a Pipeline with Tekton that clones a Repo, builds a Quarkus application with maven, builds and pushes a container Image and finally deploys a polyglot application (consisting of 5 different components) via a Helm Chart to Kubernetes. And, of course, you are triggering the whole Pipeline with some sort of activity in Git (such as a git push, release, merge .. )
Now you move to OpenShift and want to leverage the same functionalities, fully supported, integrated into your OpenShift IAM and OpenShifts built-in Security.
Exactly that is what you get with OpenShift Pipelines (Tekton) and OpenShift GitOps (ArgoCD).
But how quick are you up and running, what does OpenShift bring to the table on top of what you already know, and, also, what do you need to tweak to implement security best-practises that OpenShift enforces by design?
Prerequisites
Skills
- Working knowledge about CI/CD, Helm, and Kubernetes
Technical
- OpenShift Cluster (e.g. OpenShift Local if you don’t have a cluster in a DC or the cloud)
- Command Line / Code Editor
- oc CLI & kubectl CLI
Installation
Let us start with the basics: How do you install Tekton into your cluster? Tekton comes with a community Operator, or you can install it via Helm. In OpenShift you do it via the integrated Operator Hub which can be accessed via the UI or a simple YAML file. This installs you the fully supported OpenShift Pipelines Operator. The beauty of it is, that while Tekton alone only has a very basic Dashboard, OpenShift Pipelines fully integrates into the UI.
We chose to do the installation via YAML files that are in the projects repository. Ideally you make a fork of the Git repository because later on you will have to push into it. Make sure to uncheck the “Copy the main branch only” box.

Afterwards, clone your fork to your machine, go to the openshift branch and run the oc apply command to install the OpenShift Pipelines Operator.
#fork https://github.com/Apress/Kubernetes-Native-Development
git clone https://github.com/<your-user>/Kubernetes-Native-Development
git checkout openshift
oc apply -f snippets/chapter5/openshift/operators-subs/pipelines-operator-sub.yamlCode language: PHP (php)
Tekton Tasks
The next thing are your Tasks. Tekton Tasks are the pieces that you use to stitch together your Pipeline. The image below shows 4 typical tasks, each resembling one distinct container image that can be used to execute several “steps” such as 1) building and 2) pushing a container image.

You would usually get them from https://hub.tekton.dev/.
While you find a wealth of Tasks there, still quite a few of them come with a flaw because they want run commands as the root user. And that shouldn’t comply with your security policies and it does also not comply with OpenShift’s security measures, as we know from Part I.
Now there are two options:
- Build your own Base Images for the Task. As an example we could look at the maven task (https://hub.tekton.dev/tekton/task/maven). The community version uses gcr.io/cloud-builders/mvn. One could just replace it with another image, adhering to the security guidelines.
- But there is a much easier way: OpenShift ships with a lot of so-called ClusterTasks and basically all of the steps you see below are well covered by them. And if the included tasks don’t fit your needs, you can create your own and share them with everyone, or even across clusters. A good starting point is to use the built-in “create” function, which will show some samples, that can be used to create ClusterTasks on top of the UBI (Universal Base Image).

The Pipeline
For now OpenShift gives us all the Tasks we need for the Pipeline below.
Later, when we move to GitOps, we will integrate this with our Pipeline and do a little bit of custom work on Tasks. One we will get from the community hub and the other one we will just create ourselves.
As you’ve already crafted your Pipeline for upstream Tekton you would have your Pipeline represented in a YAML file. And you would expect it to work, because after all is OpenShift Pipelines based on Tekton! And it actually it does almost out of the Box. The only thing that has to be done is to replace 4 task references, to use the ClusterTasks instead of the ones from the community Tasks from Tekton Hub. With those ClusterTasks you can not only be sure that they are running as non-root but you also receive support from Red Hat.
  tasks:
    - name: clone-sources
      taskRef:
        name: git-clone
        kind: ClusterTask
      params:
        - name: url
          value: $(params.gitrepositoryurl)Code language: PHP (php)
In the file at snippets/chapter5/openshift/pipeline-resources/java-backend-simple-pipeline.yaml those changes are already reflected so you can run the following command to deploy your Pipeline to the OpenShift Cluster!
oc new-project localnews-pipelines
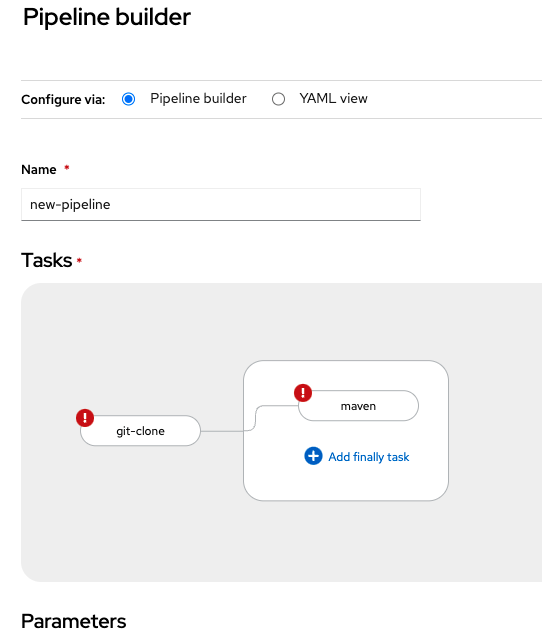
kubectl apply -n localnews-pipelines -f snippets/chapter5/openshift/pipeline-resources/java-backend-simple-pipeline.yamlCode language: JavaScript (javascript)A pretty cool feature of OpenShift is that it actually saves you a lot of YAML-work with a Graphical Pipeline Builder, completely integrated into the OpenShift UI. This is helpful, because building a Pipeline from scratch in YAML is tedious work.
Moreover, you might deploy an application with “oc new-app” or via the UI, and OpenShift generates an appropriate build and deploy Pipeline for you automatically. Afterwards, just fetch the YAML and bring it into version control for further reuse/enhancement!
RBAC
With RBAC you would probably expect some more effort. But in the case of this project, even when it ran on plain Kubernetes and not OpenShift, a Service Account to run the Pipeline had already been created and it is associated to a certain Role via a RoleBinding. That Service Account also references a Registry Secret and a secret with an SSH key for your Git Repo to access your code and will be able to push the resulting container image.

All set? Almost!
The Service Account that runs Pipelines in OpenShift needs to be added to a resource to run everything in non-root context. If you build your Pipeline via the OpenShift GUI, this is being done automatically. But since we move from upstream, we have to do it ourselves! To dig deeper go here: https://cloud.redhat.com/blog/managing-sccs-in-openshift
Therefore, we appended the following to our “pipeline-role” which you can find at Kubernetes-Native-Development/snippets/chapter5/openshift/rbac/pipeline-role.yaml in the repo.
- verbs:
    - use
  apiGroups:
    - security.openshift.io
  resources:
    - securitycontextconstraints
  resourceNames:
    - nonrootCode language: CSS (css)
To reproduce the following steps in your own environment you have to configure the
- GitHub SSH Key (git-ssh.yaml)
- Credentials for your Docker/Container Registry (registry-creds.yaml)
at snippets/chapter5/openshift/rbac to allow your OpenShift cluster to pull/push to the repo and to allow it to push container images.
After that you can apply all the RBAC resources to the Cluster.
kubectl apply -n localnews-pipelines -f snippets/chapter5/openshift/rbacRunning the Pipeline
Running the Pipeline is again something you could easily trigger via the OpenShift UI or the tkn CLI tool that Tekton ships.
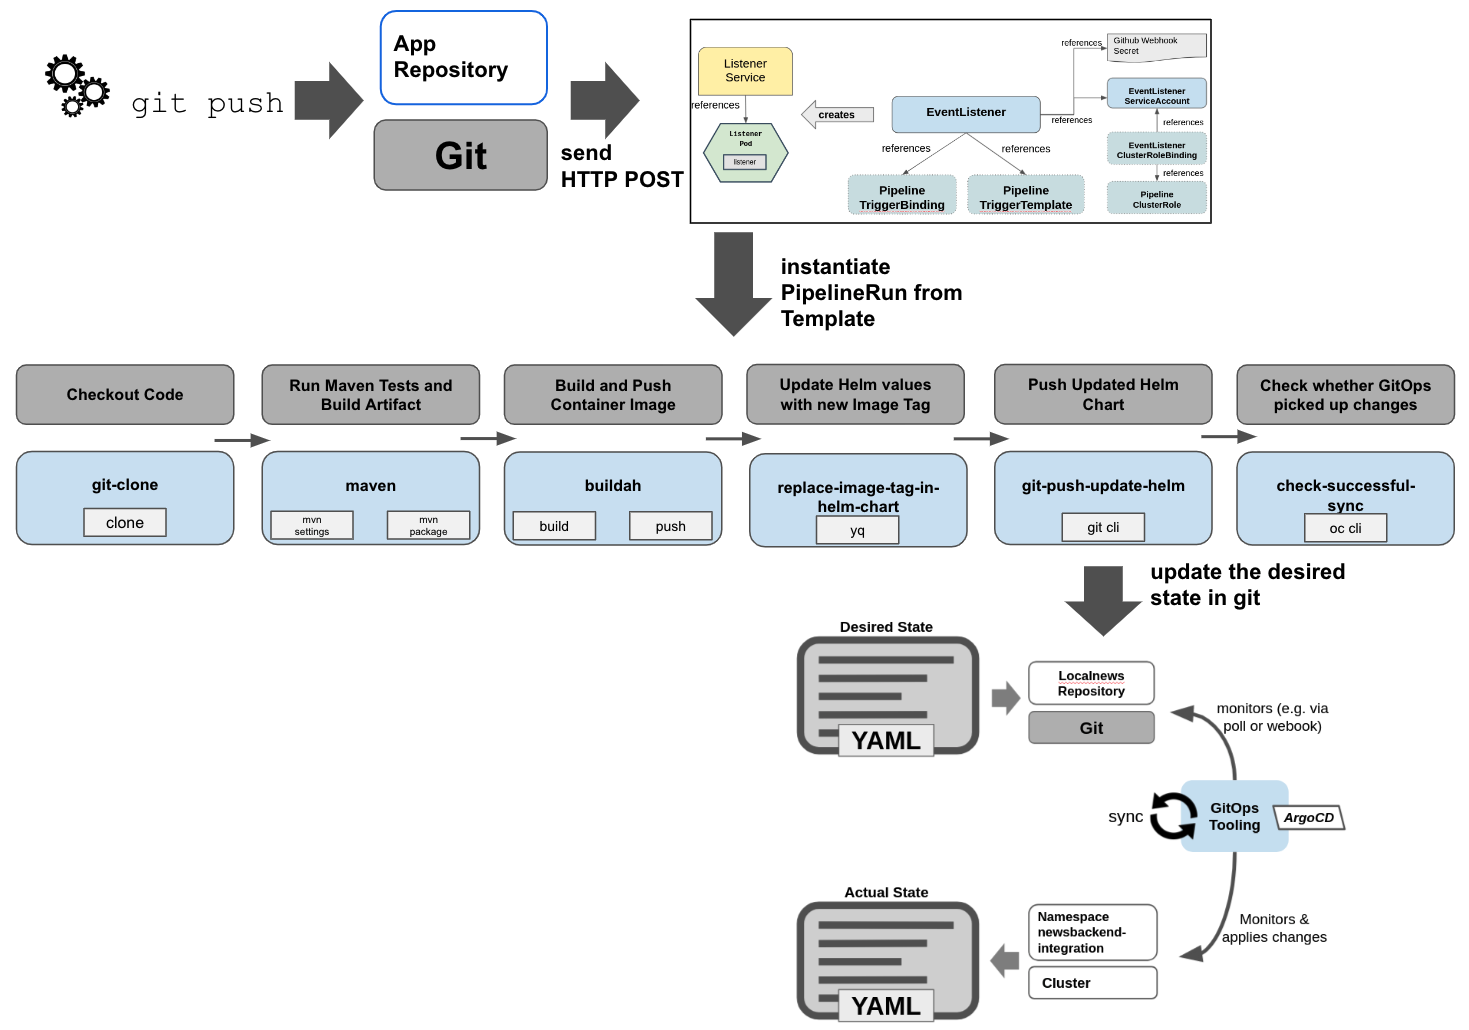
In this example, however, we will trigger it via applying another YAML to the Cluster. This YAML contains a PipelineRun, which is responsible for starting the Pipeline we’ve created earlier with specific parameters. Some of the parameters are the Git repo URL, values.yaml file for Helm, the Container Registry or the Service Account. Also a workspace has to be selected.
What is a Workspace? Actually it is a folder where all the files required/created by the pipeline are stored. And if we want this to be persistent we need a PV, claimed by the Pipeline Tasks via a PVC. In this example just a “volumeClaimTemplate” (in YAML format, included in the PipelineRun) is provided which creates a new PV for each PipelineRun to make all artifacts, such as the maven output, available afterwards.
This Pipeline builds a new Container Imager for the News-Backend component and, in its last Task, deploys the application with Helm and the Container. Therefore, let’s create a new Namespace called “newsbackend-integration”. This is the target namespace because we actually deploy the new version of the News-Backend component along with all the other components to immediately test whether they work all together.
If you want your application not only to run, but also to expose it correctly via an OpenShift Route (Ingress), go to the Helm Chart directory and configure the file at k8s/helm-chart/values-openshift.yaml with your own Cluster Ingress Subdomain k8s/helm-chart/values-openshift.yaml and push the changes back to your forked repo.
Run the following commands to create the Namespace and trigger the Pipeline.
oc new-project newsbackend-integration
## Start your Pipeline, thereby creating a PipelineRun
kubectl create -f snippets/chapter5/openshift/pipeline-resources/java-backend-simple-pipeline-run.yamlCode language: PHP (php)
Trigger the Pipeline with a Webhook
Last but not least let’s simulate how we could trigger this Pipeline automatically with a Webhook, e.g. from Github.
The EventListener and Trigger resources are already described in YAML. And, while giving you all the freedom to do what you please, this is actually a bit complicated in Tekton because it consists of several Custom Resources. The most important ones are:
- EventListener – creates a listener and endpoint for the Webhook to connect to, authorizes the incoming requests (via a Kubernetes Secret), can filter the incoming POST requests based on their Payload (e.g. only listen to specific git branches and types of actions, such as a git push); the EventListener again runs with a specific ServiceAccount that limits its privileges to only certain actions.
- TriggerBinding – serves to map the incoming (json) payload to parameters that can be used in the pipeline
- TriggerTemplate – takes the parameters and initiates a PipelineRun (in our case, it could actually create any YAML formatted Kubernetes Resource)
The image below shows how they relate to each other.

Luckily, if you would do this directly on OpenShift, the UI helps a lot to create all those resources for you, and, if you need additional tweaks, you can edit the generated YAML files.
We have them ready, and there is actually nothing that needs to be changed to make it work on OpenShift. So let’s create all of these resources including a new Service Account, Rolebinding & Role and also the Kubernetes Secret that contains a key e.g. from our Github Webhook to vet incoming requests.
kubectl apply -f snippets/chapter5/openshift/github_push_listener -n localnews-pipelinesSince we don’t want to make things too complicated for you to reproduce things, we will not create an actual Webhook on Github. Also we will not expose our Event Listener running in OpenShift via a Route/Ingress. Therefore, let’s just port-forward the Event Listener and simulate an incoming Webhook request via curl in another Terminal session like so:
kubectl port-forward -n localnews-pipelines service/el-github-new-push-listener 9998:8080Code language: JavaScript (javascript)Because the GitHub Webhook sends a checksum for its payload we also have to “fake” that here. Adapt the following JSON payload to your Git repo URL and to your Container registry. Then you can generate this HMAC signature via the following command or here.
echo -n '{"ref": "refs/heads/openshift", "head_commit":{"id": "a99d19668565f80e0a911b9cb22ec5ef48a7e4e8"}, "repository":{"clone_url":"[email protected]:Apress/Kubernetes-Native-Development.git"}, "image_repo": "docker.io/maxisses"}' | openssl sha1 -hmac "would_come_from_your_github"Code language: PHP (php)Now replace the sha1 value and your JSON payload (Git URL, Registry URL) also here and fire up the curl command below.
curl -v \
-H 'X-GitHub-Event: push' \
-H 'X-Hub-Signature: sha1=09180a0c31256ef6da0fac2cda39fceb5c2fa984' \
-H 'Content-Type: application/json' \
-d '{"ref": "refs/heads/openshift", "head_commit":{"id": "a99d19668565f80e0a911b9cb22ec5ef48a7e4e8"}, "repository":{"clone_url":"[email protected]:Apress/Kubernetes-Native-Development.git"}, "image_repo": "docker.io/maxisses"}' \
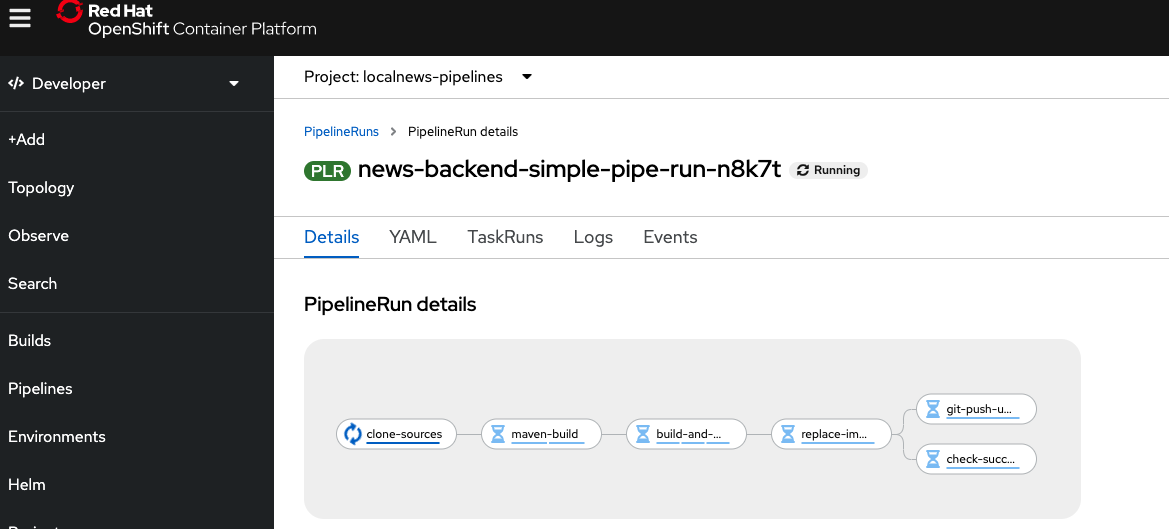
http://localhost:9998Code language: JavaScript (javascript)If everything went well and the EventListener accepted our request, we should immediatly see a new PipelineRun in our OpenShift Cluster and can follow its progress and the logs via the UI. And pretty soon we should again see the entire Local News application deployed in the “newsbackend-integration” Namespace.

If you would look closer into the YAML files in the repo you would see that in that last step the commit ID from git serves as the Image Tag. So we know that everything went as expected once we see the ID (“a99d19668565f80e0a911b9cb22ec5ef48a7e4e8”).
oc get deployments -n newsbackend-integration news-backend -o jsonpath="{.spec.template.spec.containers[:1].image}"Code language: JavaScript (javascript)Finally clean up the deployment with the following command:
kubectl delete namespace newsbackend-integrationCode language: JavaScript (javascript)OpenShift GitOps
Installation
Again let us start with the basics. How do you install ArgoCD into your cluster? ArgoCD comes with a community Operator, too, or you can install it via Helm. But just as Tekton in OpenShift you do it via the integrated OperatorHub which can be accessed via the UI or a simple YAML file. This installs you the fully supported OpenShift GitOps Operator which is based on ArgoCD. While the Pipelines UI integrated into OpenShift is already pretty powerful, the first significant steps toward a similar integration into the OpenShift UI for GitOps have been made with OpenShift v4.10.
oc apply -f snippets/chapter5/openshift/operators-subs/gitops-operator-sub.yamlIf you are unfamiliar with GitOps check out this article and the picture below showing the concept:
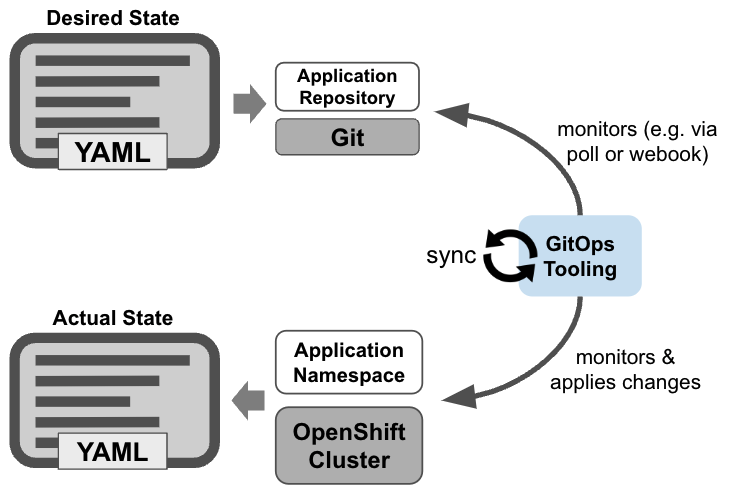
Overview
Yes, before we jump right into GitOps, let’s quickly think about how to integrate this with our Pipeline. Because at the end of the day, we would like to use GitOps together with an automated Pipeline. But the big difference is, that the Pipeline should not deploy the application anymore. Rather, it will should define a new “desired state”. In our case it means it will update our Helm Chart with a reference to the newly build container image.

Tekton Tasks
We have to start with our Tekton Tasks again. Do we have them all readily available as ClusterTasks? Almost! As before, we pull the repo, build the Java Quarkus application with maven and build & push a container image.
Then, as indicated above, rather than deploying we have to put a reference to our new Container Image into the Helm Chart, here by replacing the Image Tag with an updated value. We use yq, the YAML pendant to jq, to make those changes. But there is no lightweight container image with yq available in the cluster as ClusterTask.
We could now build a container image with the Red Hat UBI as base image and install yq, but for this demo we will use a Task from the community Tekton catalog.
kubectl apply -n localnews-pipelines -f https://raw.githubusercontent.com/tektoncd/catalog/main/task/yq/0.2/yq.yamlCode language: JavaScript (javascript)Finally, in the last two Tasks of the Pipeline, the git cli and oc cli are used to push the updated Helm Chart to our Git Repo and, afterwards, run a check for the changes to become applied to the cluster. Of course, we expect ArgoCD to catch the changes and do this by itself, but better safe than sorry 🙂 (What if ArgoCD is down by chance?)
The Pipeline
The Tasks for git and oc are both available as OpenShift Cluster Tasks, so we can just change from the community Tasks to the OpenShift certified Cluster Tasks and apply our updated pipeline.
oc apply -n localnews-pipelines -f snippets/chapter5/openshift/pipeline-resources/java-backend-simple-pipeline-gitops.yamlSince ArgoCD is installed via the supported OpenShift GitOps functionality nothing stops us now from creating our ArgoCD application, which will in fact monitor the Helm Chart and install the application in our cluster.
ArgoCD application
Before you apply the ArgoCD application to your cluster, go to the file at snippets/chapter5/openshift/gitops/argocd-application.yaml and replace the referenced Git repo URL with your own.
kubectl apply -n openshift-gitops -f snippets/chapter5/openshift/gitops/argocd-application.yamlNow you can head over to the Dashboard of ArgoCD. You find it in the top right Corner of the OpenShift UI.

You should find your application there but it will tell you that it is OutOfSync. And even after waiting for a while, it won’t get better. But you will see some permission errors. And guess what – security measures enforced by OpenShift are causing them!
OpenShift GitOps needs explicit permissions to manage the Namespace newsbackend-integration-gitops which is used to deploy the application. This is different from using upstream ArgoCD.

So, since OpenShift GitOps explicitly needs to be given access to a namespace that it is supposed to manage, just add a label to the respective namespace:
oc label namespace newsbackend-integration-gitops argocd.argoproj.io/managed-by=openshift-gitopsAfter the next poll OpenShift GitOps will notice that the associated service account now has sufficient permissions and will deploy the application via Helm.
Check it via the GUI or CLI with
kubectl describe application -n openshift-gitops localnewsTriggering the Pipeline
The application should now be up and running in our cluster. But we haven’t used our Pipeline so far to prove that it works with GitOps.
Therefore, let’s use the Pipeline to make a new build of the News-Backend” component and use our Git commit ID as the image tag so we can easily identify that it worked. Let’s check the current Image Tag:
kubectl get deployments -n newsbackend-integration-gitops news-backend -o yaml | grep image:Code language: JavaScript (javascript)It should be similar to this:

To trigger the Pipeline from Git we need again our EventListener running in the cluster. Actually, we created it already in the previous part. Let us just modify it to execute not the old, but our newly tailored Pipeline to edit and push the Helm Chart to your Git repo.
## ensure the old EventListener incl ServiceAccount and Role is still there:
kubectl apply -f snippets/chapter5/openshift/github_push_listener -n localnews-pipelines
## modify it:
kubectl apply -f snippets/chapter5/openshift/gitops/EventListenerPushGitOps.yaml -n localnews-pipelinesCode language: PHP (php)
Again, we will not do the integration with a real Git Repo, but instead mock what a GitHub Webhook typically looks like with curl. At first ensure the port-forwarding to your EventListener is active.
kubectl port-forward -n localnews-pipelines service/el-github-new-push-listener 9998:8080Code language: JavaScript (javascript)Now update the JSON Payload with your Git repo URL and your Container Registry and run the curl command to trigger the new Pipeline and create a PipelineRun.
echo -n '{"ref": "refs/heads/openshift", "head_commit":{"id": "v1.0.0-your-fake-commit-id"}, "repository":{"clone_url":"[email protected]:Apress/Kubernetes-Native-Development.git"}, "image_repo": "docker.io/maxisses"}' | openssl sha1 -hmac "would_come_from_your_github"Code language: PHP (php)curl -v \
-H 'X-GitHub-Event: push' \
-H 'X-Hub-Signature: sha1=b60860d27da67ed1753b5a262c41f35b0c20dbcd' \
-H 'Content-Type: application/json' \
-d '{"ref": "refs/heads/openshift", "head_commit":{"id": "v1.0.0-your-fake-commit-id"}, "repository":{"clone_url":"[email protected]:Apress/Kubernetes-Native-Development.git"}, "image_repo": "docker.io/maxisses"}' \
http://localhost:9998Code language: JavaScript (javascript)Remember that the JSON payload has to match the sha1 signature!
The curl should get accepted with a 202 HTTP response from the Event Listener and then you can head over to your OpenShift Cluster and view your Pipeline running.
Once the Pipeline successfully completed the git-push-update-helm Task, the check-successful-sync waits until OpenShift GitOps, respectively ArgoCD, picked up the changes and applied them to the Cluster. The default polling frequency is every 3 minutes, so it might take a few moments. In the mean time you could check your GitHub repo, which should have received a new push from your Pipeline.
But as soon as it is applied the Pipeline is green, the application is synched and, if we inspect the news-backend Deployment again, we see a new Image Tag with the values passed into the Pipeline via our fake Webhook!
kubectl get deployments -n newsbackend-integration-gitops news-backend -o yaml | grep image:Code language: JavaScript (javascript)
Some food for thought:
The attentive reader might get suspicious about the last example. Wouldn’t an actual Github Webhook (not a simulated one, as illustrated in this example via curl) cause the Pipeline to run again and again because each update on the Helm Chart via git push would trigger a new PipelineRun? The answer is yes, it would. However, there are a easy ways around it. The most straightforward way is keeping environments and configurations files separately e.g. in two different repos. Another one is Tektons ability to filter the incoming payload and for instance ignore any push made by our Pipeline Agent.
Summary
We’ve simulated a GitHub webhook that instantiated a PipelineRun with a dedicated Service Account, specific parameters and a YAML template of the Pipeline.
This YAML file could have actually been anything – not necessarily a Pipeline. So this is very flexible.
After a successful PipelineRun a new Container Image was deployed via OpenShift GitOps.
Clean Up
oc delete argoapp
oc delete localnews
oc delete newsbackend-integrationCode language: JavaScript (javascript)
Wrapping it Up
In this Part you’ve seen how the integration of different upstream projects and adding a security layer on top of it can bring significant value to your Continuous Build and Delivery Pipelines and how could integrate your Pipelines with GitOps.
In the fourth part we will see how you can use OpenShift to build, distribute and run your own Kubernetes Operator, that makes rolling out and managing your application a charm.
Authors
Benjamin Schmeling
Benjamin Schmeling is a solution architect at Red Hat with more than 15 years of experience in developing, building, and deploying Java-based software. His passion is the design and implementation of cloud-native applications running on Kubernetes-based container platforms.
Maximilian Dargatz
I am Max, live in Germany, Saxony-Anhalt, love the family-things of life but also the techie things, particularly Kubernetes, OpenShift and some Machine Learning.