

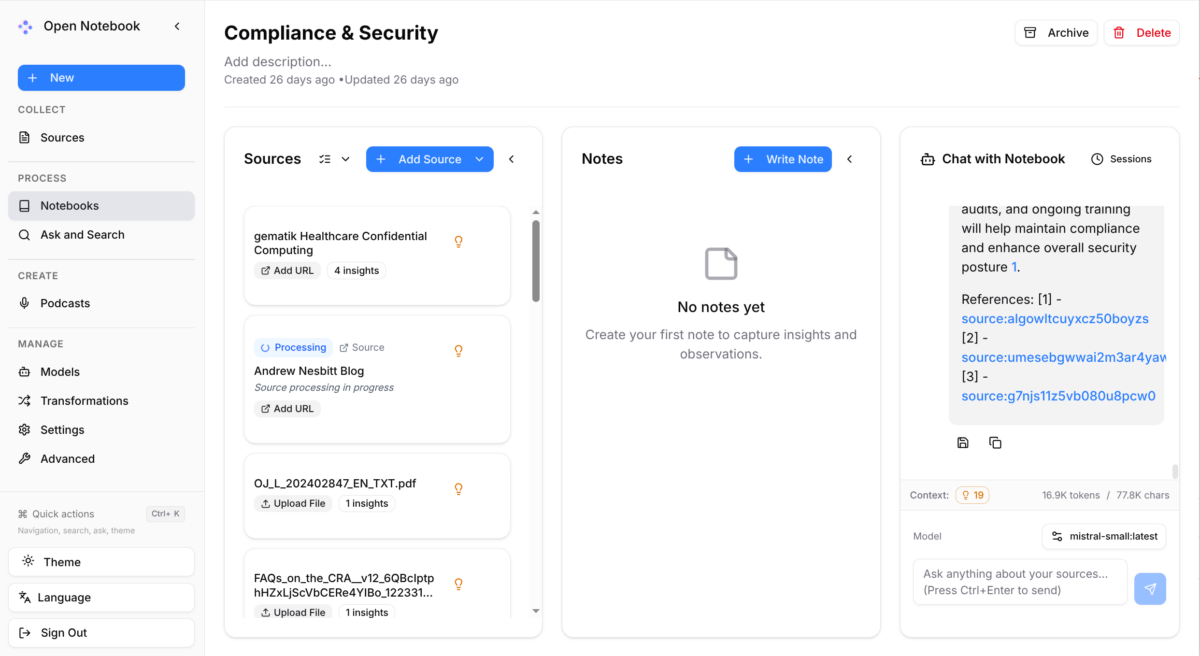
OpenNotebook works similarly to Google’s NotebookLM, but can be run locally.
Imagine a team with sovereignty concerns that wants to use something like NotebookLM without using any cloud service. This solution will help them do that. They will just need a server with a powerful enough GPU.
My goal for now is to run OpenNotebook on a laptop, with Ollama running on a different, more capable server with an AMD GPU. Both environments are running on Fedora 44. If you don’t want to use a local GPU or CPU, you can still use OpenNotebook with one of the supported providers – it will just not be sovereign.
For this to work, we need a few preparations:
- The ROCm software stack from AMD for talking to the GPU
- Ollama for locally-served models
- OpenNotebook
Prerequisites
For starters, we will need podman installed.
sudo dnf install podman podman-compose ROCm installation and configuration
Let’s do this step-by-step:
- Even with the new ROCm metapackage in Fedora 43+, the ROCm version is way behind (6.4.x vs. 7.1+), and 7.1+ brings much needed improvements performance-wise.
- So don’t install the meta package. Instead we will basically use the method presented in https://www.fixnum.org/2025-11-27-rocm7-fedora43/ with a few modifications.
- First, setup the /etc/yum.repos.d/rocm.repo:
[ROCm]
name=rocm
baseurl=https://repo.radeon.com/rocm/el10/latest/main/
enabled=1
priority=50
gpgcheck=1
gpgkey=https://repo.radeon.com/rocm/rocm.gpg.key

[AMDGraphics]
name=rocmgraphics
baseurl=https://repo.radeon.com/graphics/latest/el/10.1/main/x86_64/
enabled=1
priority=50
gpgcheck=1
gpgkey=https://repo.radeon.com/rocm/rocm.gpg.keyCode language: JavaScript (javascript)
Then proceed with the installation of a few additional packages:
sudo dnf install rocm rocm-developer-tools hipblas-devel hip-devel rocwmma-devel rocm-opencl-devel Check that everything was installed successfully:dnf list rocm
should look likeInstalled packagesrocm.x86_64 7.2.4.70204-93.el10 ROCm
Run rocminfo to determine what GPU you have. In my case this is the result:
----------
Agent 2
----------
Name: gfx1030
Uuid: GPU-ed8a5e33c3641361
Marketing Name: AMD Radeon RX 6800 XT
Vendor Name: AMD
Feature: KERNEL_DISPATCH
Profile: BASE_PROFILE
Float Round Mode: NEAR
Max Queue Number: 128(0x80)
Queue Min Size: 64(0x40)
Queue Max Size: 131072(0x20000)
Queue Type: MULTI
Node: 1
Device Type: GPUCode language: JavaScript (javascript)
or
----------
Agent 2
----------
Name: gfx1100
Uuid: GPU-4b0991827ecf3557
Marketing Name: AMD Radeon RX 7900 XT
Vendor Name: AMD
Feature: KERNEL_DISPATCH
Profile: BASE_PROFILE
Float Round Mode: NEAR
Max Queue Number: 128(0x80)
Queue Min Size: 64(0x40)
Queue Max Size: 131072(0x20000)
Queue Type: MULTI
Node: 1
Device Type: GPUCode language: JavaScript (javascript)
We will need the ‘Name: gfx1030’ or ‘Name: gfx1100’ information later to configure Ollama.
We can check how much VRAM the GPU has withrocm-smi --showmeminfo vram |grep "Total Memory"
The result for the 6800 XT isGPU[0] : VRAM Total Memory (B): 17163091968
which is roughly 16 GB.
And the result for the 7900 XT isGPU[0] : VRAM Total Memory (B): 25753026560
which is roughly 24 GB.
Ollama installation and configuration
In this article, Ollama is installed as a systemd service on a separate server. Ollama can also be installed as a container, but is out of scope for this article. Please see references for a container-based setup.
The Getting Started with Ollama guide from the Fedora project is a good starting point, but it tells us nothing about how to configure Ollama for our GPU. There is some help available elsewhere, e.g. from https://blue42.net/linux-ollama-radeon-rx5500/post/.
Let’s start with the standard installation method for Ollama.

That will install Ollama and set up a systemd service for it. The install script should detect the AMD GPU and automatically download the ‘ROCm amd64 bundle’.
For gemma-4, you need a recent version of Ollama, in our case 0.20.7+ will be just fine.
Verify that Ollama was installed correctly:
ollama --version
should yieldollama version is 0.31.2
Because we want to serve Ollama for the laptop, we need to expose it to the world. In the systemd unit file, we add:Environment="OLLAMA_HOST=0.0.0.0:11434"
For our purposes, the default context length of 2048 might be too small (and Ollama unfortunately silently fails), so we need to increase it:Environment="OLLAMA_CONTEXT_LENGTH=65000"
Restart the Ollama service with:systemctl daemon-reloadsystemctl restart ollama
Check whether the change worked by checking the service log withjournalctl -u ollama | grep "ROCm devices" -n1
The output should look like this
... ggml_cuda_init: GGML_CUDA_FORCE_CUBLAS: no
... ggml_cuda_init: found 1 ROCm devices:
... Device 0: AMD Radeon RX 6800 XT, gfx1030 (0x1030), VMM: no, Wave Size: 32, ID: GPU-ed8a5e33c3641361
or like this
... ggml_cuda_init: GGML_CUDA_FORCE_CUBLAS: no
... ggml_cuda_init: found 1 ROCm devices:
... Device 0: AMD Radeon RX 7900 XTX, gfx1100 (0x1100), VMM: no, Wave Size: 32, ID: GPU-4b0991827ecf3557
If your output does not look like this, you might need to modify the service file as follows
Environment="ROCR_VISIBLE_DEVICES=0"
Environment="HSA_OVERRIDE_GFX_VERSION_0=10.3.0"Code language: JavaScript (javascript)
(The 10.3.0 is the gfx1030 information from the step before, 11.0.0 would be the gfx1100 information for the other GPU)
We will experiment with different providers for Open Notebook, so we will preload a few models recommended for Open Notebook:
ollama pull deepseek-r1:1.5b
ollama pull gemma3:1b
ollama pull gemma4:e2b
ollama pull granite4
ollama pull llama4
ollama pull mistral
ollama pull mistral-small
ollama pull phi4
ollama pull qwen3
ollama pull smallthinker
ollama pull tinyllamaCode language: Bash (bash)
Needed for embedding in OpenNotebook (one of those will do just fine)
ollama pull mxbai-embed-large
ollama pull bge-m3Code language: Bash (bash)
Time to do some simple testing:
<code>ollama run gemma4:e2b "what is the first prime number with two digits ?"</code>Code language: HTML, XML (xml)Using ‘time’ or other tools to take measurements is unreliable in this case, as the numbers will vary wildly.
Most of the models will return the correct answer (11) with mistral (17) and tinyllama (231) being the sole exceptions so far. I think I will have trust issues with those two going forward. Please note that mistrall-small is one of the models that gives the right answer.
If you repeat the test with "what is the first prime number with three digits ?", you will probably lose trust with other models (like gemma3:1b) as well.
None of those models passed the famous “car wash test” by the way, so always proceed with caution.
Now it is time to verify that the GPU is actually used …
You can use radeontop or watch -n 1 rocm-smi to verify increased GPU load. Alternatively you can use journalctl -f -n 100 -u ollama and look for “offloading output layer to GPU”.
... source=ggml.go:482 msg="offloading 36 repeating layers to GPU"
... source=ggml.go:489 msg="offloading output layer to GPU"
... source=ggml.go:494 msg="offloaded 37/37 layers to GPU" ...Code language: Bash (bash)
If your output looks similar, you are good to go.
We are done with the Ollama server, we can now start to install OpenNotebook.
SurrealDB installation and configuration
OpenNotebook uses SurrealDB. Broadly speaking, SurrealDB is a database with the aim of supporting every data model as well as agent memory. For now we install SurrealDB the traditional way because we want to have it as a systemd service.
Following the install guide, we install SurrealDB as a system service.

We create common_vars.sh
#!/bin/bash

# Database server will be listening on localhost at this port
surreal_db_port=8000

# Can be any username
surreal_db_user=root

# Can be any password
surreal_db_pass=root

# Where the `surreal` binary lives. Also where data files and backups will be
# written to
surreal_db_root=<your home directory>/.surrealdbCode language: Bash (bash)
And we create start_server.sh
#!/bin/bash

# Import common variables like the port, username, password, etc.
source "$(dirname "$0")/common_vars.sh"

# Start the database server
$surreal_db_root/surreal start \
  --bind 0.0.0.0:$surreal_db_port \
  --user $surreal_db_user \
  --pass "$surreal_db_pass" \
  --log info \
  --no-banner \
  rocksdb://$surreal_db_root/data/database.dbCode language: Bash (bash)
And now just make it executable
chmod u+x start_server.shCode language: CSS (css)Let’s see whether this works
<your home directory>/.surrealdb/scripts/start_server.hCode language: HTML, XML (xml)should yield this at the end
...
INFO surrealdb::net: Start web server on 0.0.0.0:8000Code language: CSS (css)
Shut this down with Ctrl-C.
Now we need a proper systemd service definition in /etc/systemd/system/surrealdb.service
[Unit]
Description=SurrealDB
After=network.target

[Service]
Type=simple
ExecStart=<your home directory>/.surrealdb/scripts/start_server.sh
WorkingDirectory=<your home directory>/.surrealdb/scripts
User=<your user>
Group=<user>
Restart=always

[Install]
WantedBy=multi-user.targetCode language: HTML, XML (xml)
Check out whether this works with
sudo systemctl start surrealdb
journalctl -u surrealdb.service --since today --followCode language: CSS (css)
It should end with
... INFO surrealdb::net: Started web server on 0.0.0.0:8000
... INFO surrealdb::net: Listening for a system shutdown signal.Code language: CSS (css)
Now that this is out of the way we are ready for the real fun!
OpenNotebook installation and configuration
Loosely following the startup guide, create a project directory somewhere and also create a compose.yml file.
Until this issue is resolved, we can’t use Ollama on the same machine as OpenNotebook with Podman on Fedora (this restriction does not apply to Podman on Macs, for example). So for now, we just call the Ollama instance on another system.
Also we want to permanently run Open Notebook as a service, so place this content into /etc/containers/systemd/open-notebook.container
[Unit]
Description=Open Notebook
After=network.target surrealdb.service
Requires=surrealdb.service

[Container]
Image=lfnovo/open_notebook:v1-latest
AutoUpdate=registry
ContainerName=open-notebook
Label="open-notebook"
RunInit=true
PublishPort=8502:8502/tcp
PublishPort=5055:5055/tcp
Environment=OPEN_NOTEBOOK_ENCRYPTION_KEY=change-me-to-a-secret-string
Environment=SURREAL_URL=ws://<SurrealDB-ip-address>:8000/rpc
Environment=SURREAL_USER=root
Environment=SURREAL_PASSWORD=root
Environment=SURREAL_NAMESPACE=open_notebook
Environment=SURREAL_DATABASE=open_notebook
Volume=<your home directory>/open-notebook/notebook_data:/app/data:Z
Network=host

[Service]
Restart=on-failure
TimeoutStartSec=900

[Install]
WantedBy=multi-user.target default.targetCode language: JavaScript (javascript)
Start the service with
sudo systemctl start open-notebookYou can start using Open Notebook by going to http://localhost:8502 in your preferred browser.
In Settings / Models, add the language models we loaded earlier with provider Ollama.
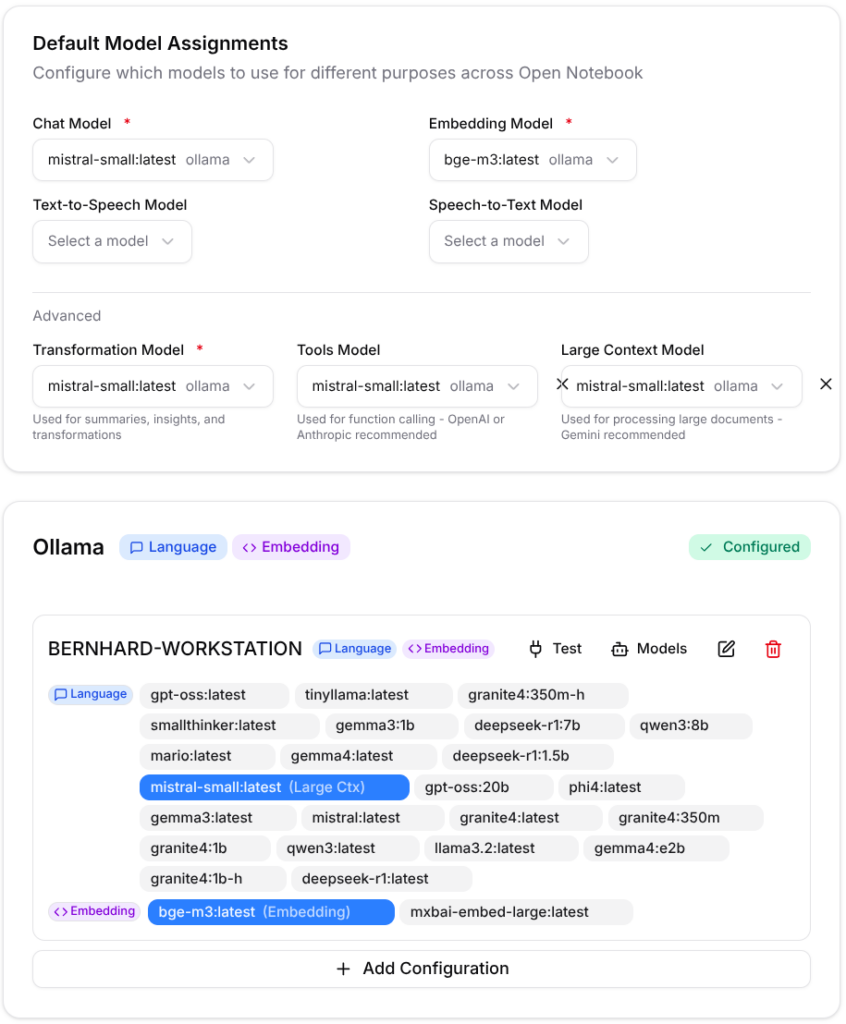
I have selected mistral-small as the default language model for now, because it is a good compromise between resource consumption and results. For Embedding I use bge-m3, but mxbai-embed-large was equally fine in my context.
Because we are using Ollama, every source can be embedded. In “Settings / Embedding and Search” you can set “Default Embedding Option” to “Always”.
Now you are ready to create your first notebook. OpenNotebook uses Sources and Notebooks. Sources can be files, URLs – you name it. Notebooks use Sources for their content. One Source can feed multiple notebooks.
Deployment on OpenShift
For everybody interested in running OpenNotebook on OpenShift, my colleague François Charette has graciously donated the required files for deployment. You can find them at this URL.
Building your own Knowledge Provider
To begin, we will create a compliance-focused notebook by incorporating a variety of initial public sources.
First, we add the sources.
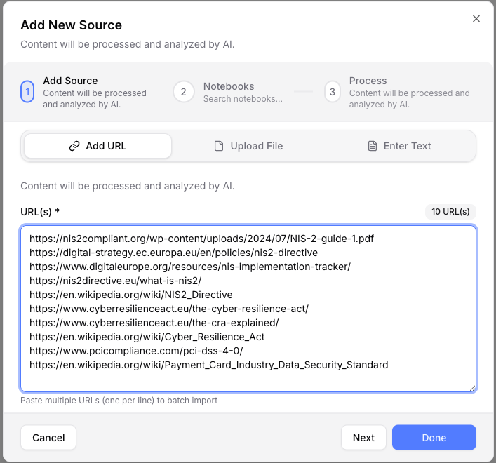
Enter the following as URLs as a single list:
NIS2
https://nis2compliant.org/wp-content/uploads/2024/07/NIS-2-guide-1.pdf
https://digital-strategy.ec.europa.eu/en/policies/nis2-directive
https://www.digitaleurope.org/resources/nis-implementation-tracker/
https://nis2directive.eu/what-is-nis2/
https://en.wikipedia.org/wiki/NIS2_Directive
CRA
https://www.cyberresilienceact.eu/the-cyber-resilience-act/
https://www.cyberresilienceact.eu/the-cra-explained/
https://en.wikipedia.org/wiki/Cyber_Resilience_Act
PCI-DSS (see https://www.pcisecuritystandards.org/document_library/)
https://www.pcicompliance.com/pci-dss-4-0/
https://en.wikipedia.org/wiki/Payment_Card_Industry_Data_Security_Standard
Then, create a new notebook called “Compliance” and associate to it all the sources we’ve just added. After some processing, we can ask questions like “What is the strongest impact of the CRA for software development ?” and we will get a very detailed overview of the consequences of the CRA.
But, there is more. You can also ask “Give me a specific prioritized timeline on how to implement the CRA as a software manufacturer.” It will give an elaborative answer and even ask back questions like “What type of software do you primarily develop ?” or “What is the size of your company ?” or “What is your current level of cybersecurity maturity ?”
Depending on your answers, the notebook will then refine the timeline.
Go on, implement this on your own system and have fun – maybe also on a different topic!
Please remember that this is a very young project that changes quite often. For the time being, OpenNotebook is best suited for personal use or use by a small team.
References
Not all references were used in writing this post. They might serve as useful reference for others delving deeper into this topic.
The article that brought my attention to Open Notebook: https://www.cnet.com/tech/services-and-software/i-love-notebooklm-but-this-open-source-version-could-tempt-me-to-switch/
Project website: https://www.open-notebook.ai/
Ollama GPU documentation: https://docs.ollama.com/gpu
Fedora page about Ollama: https://docs.fedoraproject.org/en-US/quick-docs/ollama/
Fedora Magazine article about Ollama and Open WebUI: https://fedoramagazine.org/running-generative-ai-models-locally-with-ollama-and-open-webui/
ROCm 7 installation on Fedora 43: https://www.fixnum.org/2025-11-27-rocm7-fedora43/
Running Ollama models on a Radeon RX 5500: https://blue42.net/linux-ollama-radeon-rx5500/post/
Ultimate Guide to Ollama Models: https://practicalwebtools.com/blog/ollama-models-complete-guide-2025
Ollama Explorer: https://ollama-explorer.vercel.app/models
Choosing the right Ollama model for your hardware: https://ollamamodels.com/recommended
Best Ollama Models ranked: https://www.morphllm.com/best-ollama-models
Optimization:
- Configuring Hybrid Inference: https://markaicode.com/switch-cpu-gpu-inference-ollama/
- Force CPU / GPU usage: https://blog.voina.org/how-to-force-locally-run-ollama-ai-models-to-use-all-your-cpu-or-gpu-cores/
- Ollama performance tuning: https://collabnix.com/ollama-performance-tuning-gpu-optimization-techniques-for-production/
Olama in a container: