In the past articles I independently sat up an Eclipse Kapua service using Docker containers and installed Eclipse Kura on a Raspberry Pi. Now its time to connect these and see what happens.
Preparing Kapua
At first, since Kapua is a multi-tenant installation, we need to create an organisation and an admin user in this org.
(I mostly followed the upstream documentation here: kapua/kuraKapuaDocs.md at develop · eclipse/kapua · GitHub )
After logging into the Kapua webUI using the default admin user “kapua-sys” and password “kapua-password”, we need to create a new tenant or organization.
Unfortunately, tenants in Kapua are called “accounts” which is a little bit confusing (at least for me). Therefore we need to go to “Child Accounts” in left pane and add a new account by pressing “Add” in the upper left corner.
Let’s us as example the account “ACME123”:
- Account Name: ACME123
- Organization Name: ACME Org
- Email: [email protected]
Then we press “submit” and click on the new created account.
Before we create a user under this account, we have to change some settings under Settings tab below. Basically every boolean setting has to be set on true except “TagService”. Every other setting should not be changed.
In the users tab, we now can add a User:
- Username: user123
- Password: Kapu@12345678
The password needs to have at least 12 characters, with special characters, upper and lowercase and numbers. Because this is used in devices it should not be to easy to guess in a real world scenario.
The should now be created and we need to give this user some rights. For this, we have to switch from the master account to new ACME123 account. This can be done in the upper right corner using “Switch Accounts”.
Now we can go to the “Users” view and select the user123 user.
In the lower part we have “Role” and “Permissions” tabs.
In the “Role” tab, we add the “admin” role. After that we go to “Permissions” and grant all rights to the user.
Now we have everything ready in Kapua to connect!
Configuring Kura to connect to Kapua
After setting up Kura as described in Installing and running Eclipse Kura on a Raspberry Pi B (Model 1) ,
we can edit the cloud configuration settings.
At first we login to the Kura web interface (admin/admin).
Then we got to the “Cloud Service” view and fill in the data under “MqttDataTransport”:
- Broker URL: mqtt://[IP address of the kapua service]:1883/
- Topic.context.account-name: ACME123
- Username: User123
- Password: Kapu@12345678
- Client-id: “rpi-1” (this needs to be the same as “device custom-name” in CloudService
Then go to “DataService” and set “connect.auto-on-startup” to true.
All other fields remain unchanged.
Now its time to clck “Connect” and the device is shown as connected,
In Kapua, the newly connected device is now visible under “Devices” and “Connections:
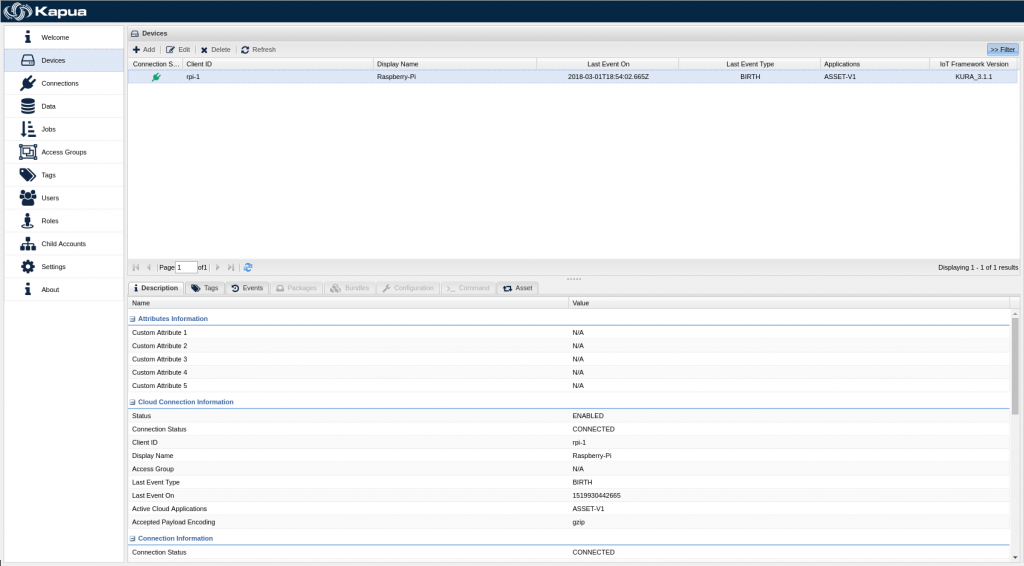
Kura is now fully configured and ready to send some data.
Sending Data to Kapua
As you can see, our data sections Kapua is empty. That is because we did not yet send any data to it. So in this example we will user Example publisher deployment package, which can be obtained from Eclipse marketplace.
This bundle sends some data to provided Cloud (in our case Kapua). We will use it to verify our connection. Click here to visit Example Publisher page.
Click on download button and copy the link address (it has .dp extension) and paste it into Kura -> Packages -> Install/Upgrade -> URL.
Now we need to activate the service:
Click “+” right from search box. Under Factory select org.eclipse.kura.example.publisher.ExamplePublisher, set a Name of your choice and click Apply.
Example publisher then automatically starts sending data to Kapua, which can be verified in kura.log file or in Kapua itself (kura.log file is in on Raspberry Pi in /var/log folder).
Data in Kapua can be observed under “Data”.
This looks very promising and I will continue with the next steps:
- import Kapua into OpenShift and create a template for an automated deplyment
- connecting sensors to the Gateway and generate some useful data!
One reply on “Connecting Kura to Kapua”
It is so nice to see somebody is using KuraKapuaDocs.md file! 😀