Although OpenShift becomes more and more known, there still are quite some people who are not fully aware about OpenShift and how it works.
In addition to the common methods of presentations (“slides on beamers”), there are always opportunities to make software or processes in software more visible and tangible. So we show a slide, that says: “Now let’s have a look inside of OpenShift”, then a dark black slide.
Now – Wait five seconds before you are starting to explain to the audience what will happen next!
While you talk, you can setup the “cardboard OpenShift cluster” on the table, as you like.
It is most often highly appreciated by clients, if you show them something different than slides. So this is something different and it makes some of the processes inside OpenShift visible and much easier to understand.
You should admit, that there will be some “abstractions” and things are a little bit more complex in reality, but no one ever complained.
IMPORTANT: Make sure you know your sequence and what you are going to explain. Some practicing upfront is highly recommended!
Intention:
To make visible how OpenShift works internally. (with some “abstractions”, here and there)
Materials needed:
- PDF-file to print out the “containers” on paper.
- Eight „medium-sized“ cardboard boxes (e.g. 23 x 17.5 x 10 [cm])
- About 20 (or more) sheets of paper to print on, use different colored paper, if available. One should have at least 10 containers. The more containers the more impression to make.
- Scissors and glue.
- A sharpie marker for writing on the cardboard boxes.
Expect this to take about an hour to build. Don’t do it in a rush!

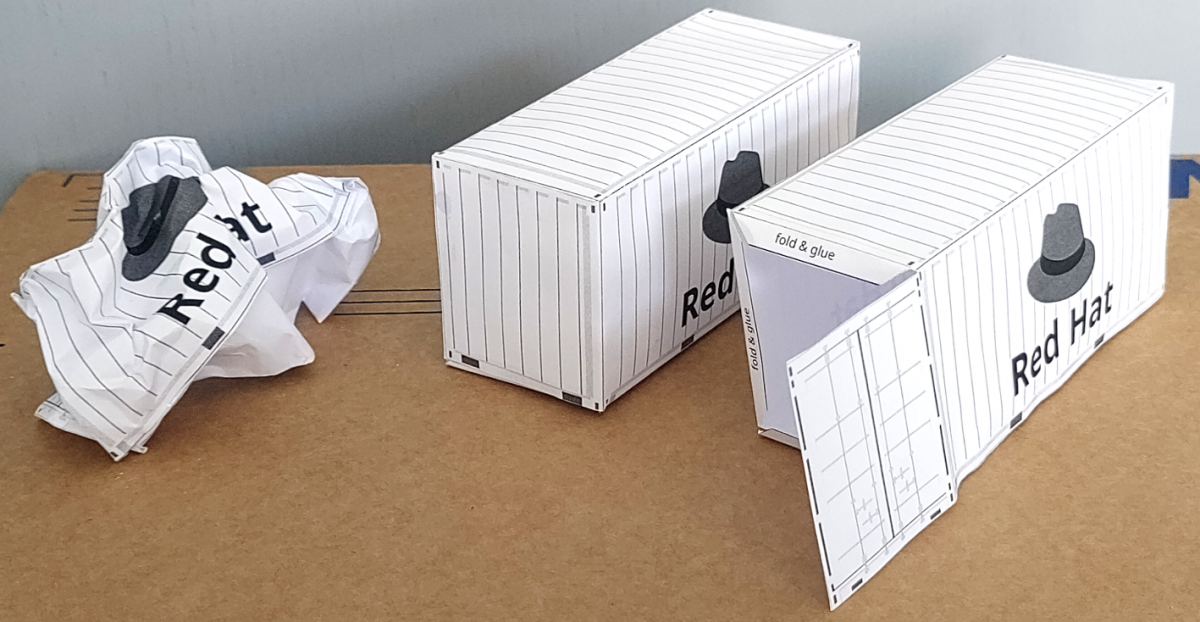
This is how the printed containers look like. It pays out to be quite accurately while cutting it out. While folding, it is recommended to fold sharp edges. So the container will look more like a container and not like a wanna-be container and it will be more stable.
Procedure:
- Print the PDF file with the container onto the sheets of paper. The graphic is sized to fit on DIN A4. (297 x 210 mm)
- The printed containers are now cut out, folded accurately, and glued together using as little glue as possible. (Try one and you understand the hint 😉 )
Use the areas that say “fold & glue”. - The result should be containers that look like it. If you like, you can leave the “doors” open to explain any processes inside the container. That‘s up to you!
- Then a cardboard box is folded and labeled “Container Repository”. This is where the finished and dried containers are collected.
- For the presentation, three boxes are folded and labeled “Control plane [1-3]”.
- In addition, two more boxes, but labeled with “Worker Node [1,2]”.
- The seventh box may or may not already be labeled “Worker Node 3”.
- Keep the eighth box at easy reach, you may want to use it later.
Now we have:

… or as a real-life example:

and now with a look inside:

Here we also see some intentionally left open containers.
And if you wonder how these containers may look like, here is a more close-up.

In the middle we see a closed container, on the right an intentionally left open container and on the left a “crunched” container.
A “regular” paper-container has about the following size:
height: 51 mm, width: 45 mm and length: 112 mm.
This may slightly vary, depending on the accuracy used while building these containers. Although they are made out of paper and some glue, they are quite stable:

But, don’t worry! It’s still easy to crunch them!
Now you are prepared and ready to rumble. BUT … before you leave the house, double check, if you have your fully equipped “cardboard OpenShift cluster” with you. In the beginning a little check list may help.
… and also make sure, you practiced enough to know your presentation and what you are going to explain and how. There is only one chance to make a great first impression.
The following paragraph is what it says, an example of how such a presentation may run. You may stick to it or enhance it where ever it appeares necessary and/or feasible to you. Although it has been quite successful, it is no guaranty for nothing.
It depends mostly on you and how you do your presentation. The more fun you have yourself presenting this, the more excited your audience will be.
Exemplary course of a presentation:
At the beginning the basic structure of OpenShift is explained using the “control-planes” and the two worker-node boxes. Explain how they depend on each other and what their jobs are, give some, but not too much details. Just set the scene!

Then, a container is taken from the „container-repository“ and placed into one of the worker-node boxes. This is a visible deployment. (Yes! Some “abstractions” here!)
Now the containers are distributed to the worker-node boxes, except for at least three containers that remain in the “container-repository”.
Now that all the worker nodes are “at capacity”, we will explain how to use „machine sets“ to create another worker node; in our case, the remaining cardboard box “worker-node 3”.
It makes sense to assemble it in front of the audience while you talk, as it visualizes the process of the creation of an additional worker-node.
This new box is added to the other worker-nodes, unfolded and a container is „deployed“ into it. Now your “cardboard OpenShift cluster” has more power!

Even in the best data centers, a server breaks down from time to time. To visualize this, a worker-node is elegantly thrown over your shoulder. (make sure you don’t hit someone!!!!)

Now a new worker-node is created from the remaining box and placed in the OpenShift cluster, opened and filled with one of the remaining containers from the container repository. You may name it “worker-node 3” again, or something else. Just as you like.

Because containers are immutable, they are never patched or updated, but the existing containers are replaced with new versions. To visualize this, you take one or two containers from one or more worker-nodes, crunch them and casually throw them over your shoulder, saying “these containers will be discarded”. This makes it very understandable!
Then you take two new containers from the container repository (with different colors, if any, than the discarded containers) and deploy them to the worker-nodes.
“This, ladies and gentlemen, is basically how OpenShift works!”
Options:
- One can place the worker-nodes and control-planes on multiple tables to simulate different fire sections in an imagined data center, if there are enough tables and space.
- You also may explain how containers are “shifted” from one worker-node to another. It makes a great impression, if you really crunch a container … and throw it elegantly over your shoulder. Then replace it with a brand new container from the container-repository on a different node. Don’t forget to explain what is currently happening.
- If you want, you can visualize the network with small holes in the boxes and wool threads through them. Then it gets a little more complicated with throwing away the worker-node, but with scissors you can cut these network connections and then throw away the box. That would also visualize the “cut” of network connections.
- With different wool threads in different colors and thicknesses, you can make the network theme even more explicit. The colors mean e.g.: different connection types (administration- or workload-network) and the different material thicknesses the possible bandwidths. But this may be a little bit overdone in some occasions.
Tips and tricks
For convenient transportation, it is recommended you build your “cardboard OpenShift cluster” on site or the evening before the meeting in your hotel. So you wont have too many boxes to handle during travel.
You may consider building the container-repository and the containers upfront, so you can be relaxed when you arrive at client’s site.
If the people in your audience get a little bit shocked, when you crunch and throw your containers and worker-nodes elegantly over your shoulder, then you are on the right track. Watch your audience and figure out their reactions.
Best trick ever: Practice upfront and know your sequence and stick to it! Don’t improvise! You may run out of containers pretty fast!
Very best trick ever: Practice, practice, practice, ….
Please find attached the files for the paper-containers.
Download, print, cut, glue … have fun! All available under CC-license.