In Part 4 of our blog series “You’ve written a Kubernetes-native Application? Here is how OpenShift helps you to run, develop, build and deliver it”, we will explain how to deploy our own operator for our sample app “Local News” to OpenShift. The focus of this article is not so much on the development of the operator itself but more on the process of how to manage and run it on OpenShift. But before we delve into the details, let us briefly look at where we are in our journey.
In Part 1 Run: Get your Angular, Python, or Java Dockerfile ready with Red Hat’s Universal Base Image and deploy with Helm on OpenShift, we discussed the foundations and prerequisites for deploying a Kubernetes-native application to OpenShift. In Part 2 Develop: The Inner Loop with OpenShift Dev Spaces, we shifted our perspective to the inner loop development, more specifically on how to leverage a cloud-native IDE called Dev Spaces on OpenShift. In Part 3 Build: From upstream Tekton and ArgoCD to OpenShift Pipelines and GitOps, we navigated you through the outer development loop including the build and deployment of our application.
After this quite comprehensive journey, we are equipped with the most valuable tools to cover the whole application development lifecycle. We know how to write code, build it and finally deploy it to OpenShift. What else should we take care of? To answer this question, let us take the perspective of an administrator who is operating the application. Although OpenShift standardizes and automates various administrative tasks, there are still many of them that are still manual and require a lot of application-specific knowledge, especially the ones that fall into the category of so-called Day-2 operations.
Automating Day-2 Operations with Operators
Besides the installation of an application, an operator typically automates Day-2 operations such as
- Upgrades – The operator upgrades an application to a newer version. It knows the dependencies and the required steps to fulfill the upgrade. Furthermore, the operator is able to roll back if necessary.
- Backup & Restore – The operator is able to create backups for the data it is managing, especially if it is a stateful application. The backup can either be triggered automatically or manually.
- Reconfigure/Repair – The reconfigure and repair capability is also often referred to as auto-remediation. It should ensure that the operator can restore the application from a failed state. The failed state could, for instance, be determined via health checks or application metrics.
- Collect metrics – The operator provides metrics about the operational tasks which were handled, potential errors, and the (high-level) application state. It may also take over the task of providing metrics for the applications it is managing.
- (Auto) Scale – The operator knows the bottlenecks and how to scale the application and its resources horizontally and/or vertically. For autoscaling, it can collect the metrics the scaling should rely on. When a certain threshold is reached it scales up or down.
This is not a complete list and there are usually additional application-specific tasks such as schema updates, reindexing of search indexes, and many more that can be implemented by an operator.
The Operator Design Pattern
The operator design pattern describes the high-level concepts of an operator. There are three components: the code that captures the operational knowledge, the application to be managed by the operator, and a domain-specific language to express the desired state in a declarative way. The operator code watches the desired state and applies changes whenever it deviates from the actual state. Furthermore, it reports the current status of the application.

Different Types of Operators
To write an operator, you can choose from different types of languages to implement its logic. These are the most common types of operators that you will find:
- The Helm-based operator takes existing Helm charts (or creates new ones) and turns them into an operator. It creates a simple CRD that accepts your well-known Helm parameters as part of the spec of your custom resource. In addition, it generates a controller that takes care of syncing the state of the Kubernetes resources with that of your Helm chart. Every time you change your custom resource it will create a new Helm release. If you change resources in the cluster it will change them back to the state described by the custom resource. This is the easiest but most limited type of Operator since it operates on the install/update level.
- The Ansible-based operator turns an Ansible playbook into an operator. It creates a simple CRD and whenever a custom resource of this kind will be created, updated, or deleted an Ansible role is run by the generated controller. The contents of the spec key can be accessed as parameters in the Ansible role. We won’t elaborate on this any further as it is out of the scope of this book. If you would like to find out more about this approach please refer to the docs about Ansible operators.
- The Go-based operator generates a Go code skeleton with a reconciliation loop that can be extended with our custom logic. Furthermore, it allows us to express your CRD as a Go struct. This is the most flexible approach of the three but also the most complex one.
- There is also a Java-based operator with similar functionality as the Go-based operator but based on Java.
The benefits of the Helm-based Operator on OpenShift
In this article, we will work with the Helm-based operator as it is a relatively simple example of an operator. However, at this point you might ask yourself, why are we doing all this if there is just Helm behind the scenes? Why don’t we use Helm directly without being embedded in an operator? And, since Operators are a Kubernetes-concept, is OpenShift adding anything to the mix?
First, the operator will prohibit config drift: If someone would accidentally delete or modify one of the resources managed by the operator, the operator would revert it to the desired state. Second, you can package your whole application and nicely distribute it via the OpenShift-integrated OperatorHub. And, last but not least, you manage your application easier and in a Kubernetes-native way, because operators extend the Kubernetes API, as we will discover in this article.
Now let’s look at why Operators are much easier to deploy and manage with OpenShift. In the previous parts of this series we have seen that OpenShift nicely integrates with Helm. And the same is true about Operators. We will see that Operators have there own catalog UI, management plane and also lifecycle functionality built into OpenShift.
Creating a Helm-based Operator
The best way to create an operator is the Operator SDK. It is a set of development tools for operators. It contains among other things a way to generate a new development project with a basic code structure to start from. So the first step to creating your operator is to install the Operator SDK as described in https://sdk.operatorframework.io/docs/installation/
For our sample – the Local News App – we have a Helm chart at hand. The next step is to initialize the project, based on this Helm chart.
To follow along you’ll need the Git repo. Clone it like this:
git clone https://github.com/Apress/Kubernetes-Native-Development
git checkout openshift
cd Kubernetes-Native-DevelopmentCode language: PHP (php)
As we want to run a Helm-based operator, we add the helm plugin and the path to our existing chart directory. You can use the Local News Helm chart in the k8s/helm-chart folder of our Git repository. In order to do that you should create a folder and use the init command:
mkdir k8s/operator/my-own-operator
cd k8s/operator/my-own-operator
operator-sdk init --plugins helm --helm-chart ../../helm-chart
In your folder you can inspect the boilerplate files generated for your operator. If you need more information about the different steps and options for creating an operator you will find more on this here. However, the good news for all our impatient readers is, that we already provide a ready-to-use operator in our repository in the following folder: k8s/operator/news-operator-helm.
The Local News Operator
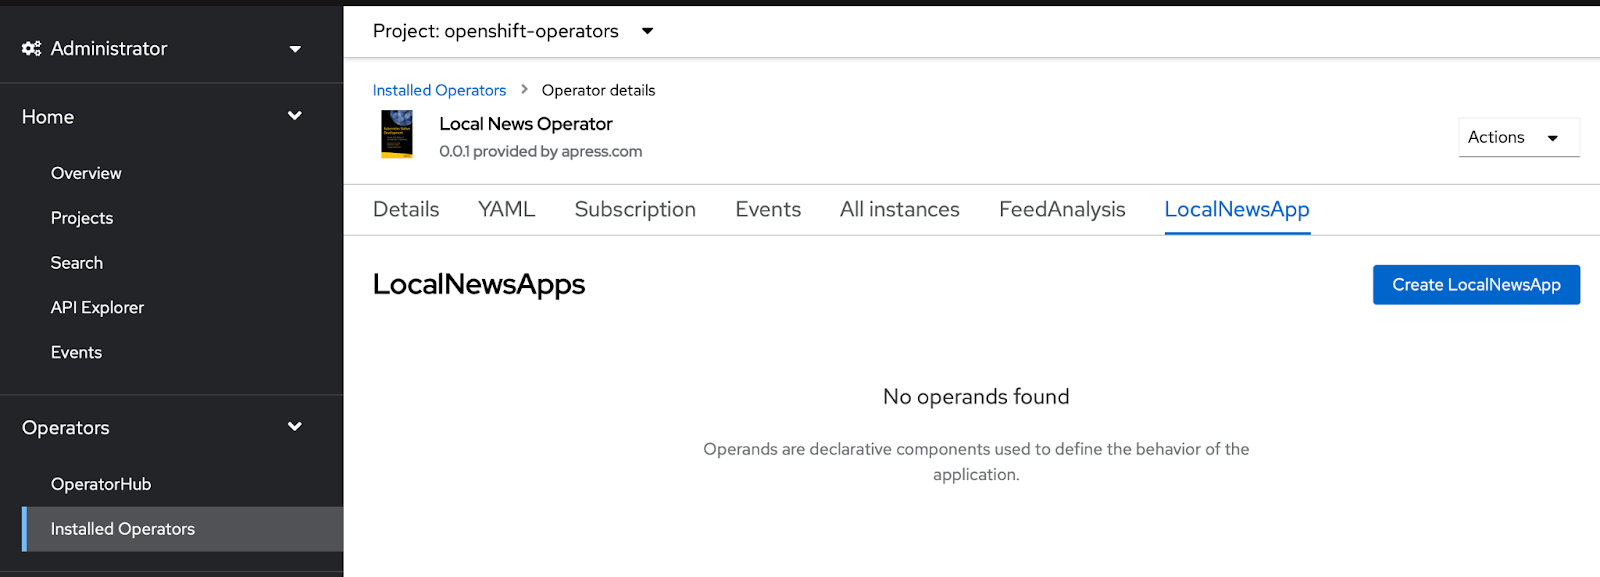
The Local News operator has been generated with the Operator SDK 0.24.0 based on our Helm chart k8s/helm-chart. It supports managing the lifecycle of Local News applications via a Custom Resource Definition (CRD) called LocalNewsApp. A CRD is an extension to the Kubernetes API. In that case, it is used to deploy instances of the Local News application.
So, whenever you create an instance of this CRD in a particular project, the operator will deploy the application to the same project. If you delete the CRD, the operator will uninstall the application accordingly. Since our operator is based on a Helm chart, it also understands the parameters that reside in the values.yaml file of our Helm chart. If you want to modify the application configuration, the YAML of our CRD recognizes all Helm parameters in its spec section.
We also created another CRD called FeedAnalysis to simplify the process of scraping additional news feeds by creating an abstraction above the Feed-Scraper component. You can easily add new RSS feeds to scrape news simply by defining them in YAML or with oc/kubectl. This makes application management a whole lot more convenient. We will not cover it in this article, but feel free to play around with this CRD on your own.
Running the Operator locally
The Operator SDK generated a Makefile in the root folder of the operator project that can be used for multiple tasks such as running and deploying the operator, installing the CRDs, and building different types of container images. The most straightforward way — and at the same time, the most practical one — for developing the operator is to run the controller logic directly on your local machine. In this case, the code will communicate with your cluster via the OpenShift API.
To follow the steps below, your user should have cluster admin rights. If your user doesn’t have such rights, you can assign additional permissions manually, but this is out of the scope of this article. Now we are ready to run the operator by creating a new target project and to run the make command from the root folder of the git repo.
oc login
oc new-project localnews-operator
make -C k8s/operator/news-operator-helm install runCode language: JavaScript (javascript)
The make command deploys the CRDs to your cluster and executes the Helm operator logic. As a result, you will see its logs on your local machine:
local-news-shift/k8s/operator/news-operator-helm/bin/kustomize build config/crd | kubectl apply -f -
customresourcedefinition.apiextensions.k8s.io/feedanalysis.kubdev.apress.com created
customresourcedefinition.apiextensions.k8s.io/localnewsapps.kubdev.apress.com created
/usr/local/bin/helm-operator run
To trigger a deployment of the Local News application, we first need to create a new Custom Resource (CR) of type LocalNewsApp. This CR is an instance of the CRD we implemented earlier. If the term CR is new to you think of a simple Kubernetes Deployment. It is not a custom, but a default Kubernetes resource. And, moreover, it is not a custom RD, but an instance of the default resource definition Deployment.
To print your OCP Cluster domain, which we will need to specify in the CR you can use the following command:
oc whoami --show-server=true | sed -E 's/https:\/\/api\.|:6443//g'Code language: JavaScript (javascript)Now, edit the file snippets/ocp6-operator/localnews.yaml and add your cluster base domain. Since this is an operator based on Helm we specify our Helm parameters in the spec section of the CR.
apiVersion: kubdev.apress.com/v1alpha1
kind: LocalNewsApp
metadata:
  name: mynewsapp
spec:
  localnews:
    domain: <your OCP base domain> Code language: HTML, XML (xml)
After adding the domain, we can create the CR and watch the deployment of the whole Local news application:
# In another terminal tab from the git root folder
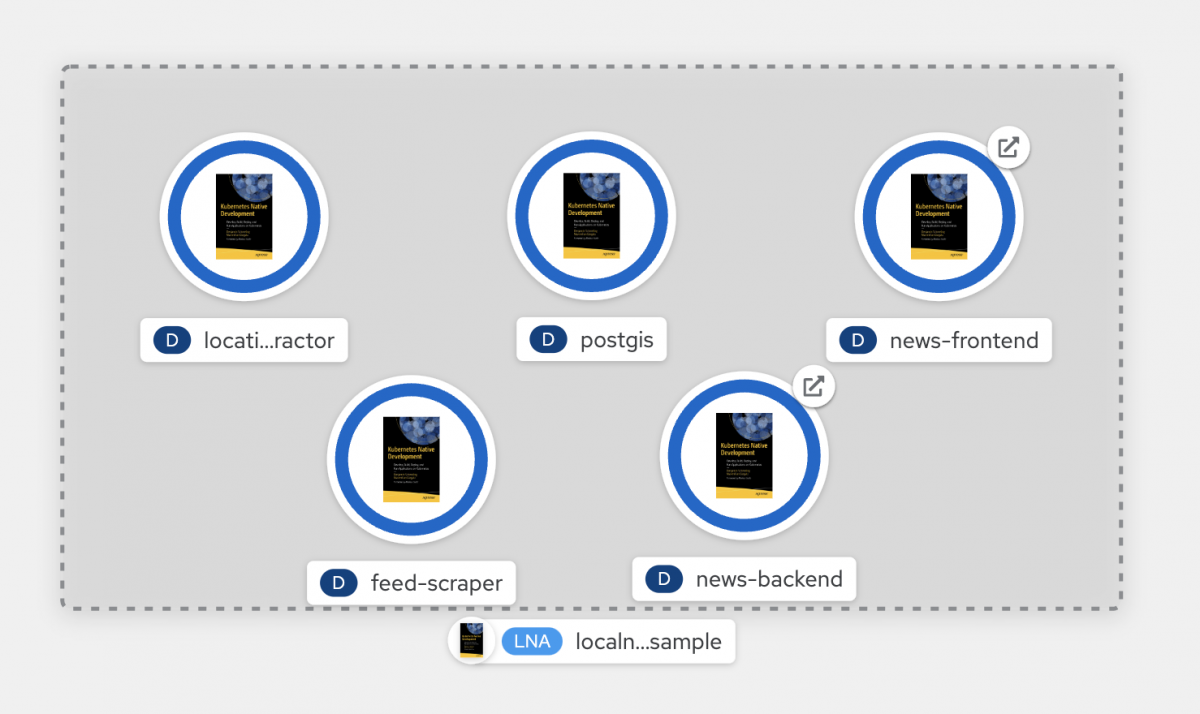
oc apply -f snippets/ocp6-operator/localnews.yaml Code language: PHP (php)Our LocalNewsApp CRD has now one instance in the project localnews-operator. If you click on one of the deployments in the topology view of that project and scroll down in the details on the right column, you will find that the resource has an Owner: LNA mynewsapp.

You can also navigate to the CRD via the API Explorer and show its instances. In this case, you will find one instance called mynewsapp.

Helm behind the scenes
Since we decided to use the Helm-based operator, it is obvious that Helm played a central role in how our application has been deployed. We can easily check this by navigating to the Helm section of OpenShift’s Developer Perspective. There, we can see the Helm release that has been performed by our operator.

When clicking on the release and switching to the Resources tab, OpenShift shows us a list of all resources that have been deployed by Helm.

No more config drift
In the beginning, we pointed out that the operator always maintains the desired state of our application.
Let’s demonstrate this. Switch back to the Topology View and select one of the deployments, e.g. the news-backend, and scale it from 1 to 0. Our operator will immediately scale back from 0 to 1 to reach the desired state of 1 replica (defined by the defaults in our values.yaml file of the Helm chart). Note that in contrast to pods, which are managed by replica sets and deployments, there is no built-in controller for deployments. Usually, if you delete them, they are gone! The same is true for things like config maps, services, ingress, and others.
So, let us try to delete the whole deployment and you will see that it will be recreated:
oc delete deployment news-backend
oc get deployments

NAME               	  READY   UP-TO-DATE   AVAILABLE   	  AGE
feed-scraper       	   1/1        1            1           	 3h51m
location-extractor   	   1/1        1            1          	 3h51m
news-backend       	   0/1        1            0          	 3s
news-frontend        	   1/1        1            1          	 3h51m
postgis              	   1/1        1            1          	 3h51mCode language: JavaScript (javascript)
Finally, we uninstall the whole Local News application again by simply deleting the LocalNewsApp CR with the command and stopping the make run:
oc delete -f snippets/ocp6-operator/localnews.yaml
oc delete project localnews-operator Code language: JavaScript (javascript)
Deploying the Operator to OpenShift
If you tested your operator and it works as expected, the next logical step is to deploy the operator directly to your OpenShift cluster. Remember, in the previous approach it actually ran on your local machine and just interacted with OpenShift via its API server.
For this, we first need to build an image of our controller logic and push it either to the internal OCP registry or to another repository accessible from your OCP cluster. We will demonstrate this step with Quay.io, which is Red Hat’s public image registry. If you want to run it yourself, you must replace the IMG variable with your image URL pointing to your repository. Otherwise, only use the deploy commands.
# Build the image and push it to the registry
make -C k8s/operator/news-operator-helm docker-build docker-push IMG=quay.io/k8snativedev/news-operator:0.0.1-openshift

# Deploy the operator and create the CR
make -C k8s/operator/news-operator-helm deploy IMG=quay.io/k8snativedev/news-operator:0.0.1-openshift
oc new-project localnews-operator
oc apply -f snippets/ocp6-operator/localnews.yaml Code language: PHP (php)
The deployment process will create a new project called news-operator-helm-system, a service account for the operator, several roles, role bindings a config map, and the deployment for the operator itself as the logs show:
namespace/news-operator-helm-system created
customresourcedefinition.apiextensions.k8s.io/feedanalysis.kubdev.apress.com created
customresourcedefinition.apiextensions.k8s.io/localnewsapps.kubdev.apress.com created
serviceaccount/news-operator-helm-controller-manager created
role.rbac.authorization.k8s.io/news-operator-helm-leader-election-role created
clusterrole.rbac.authorization.k8s.io/news-operator-helm-manager-role created
clusterrole.rbac.authorization.k8s.io/news-operator-helm-metrics-reader created
clusterrole.rbac.authorization.k8s.io/news-operator-helm-proxy-role created
rolebinding.rbac.authorization.k8s.io/news-operator-helm-leader-election-rolebinding created
clusterrolebinding.rbac.authorization.k8s.io/news-operator-helm-manager-rolebinding created
clusterrolebinding.rbac.authorization.k8s.io/news-operator-helm-proxy-rolebinding created
configmap/news-operator-helm-manager-config created
service/news-operator-helm-controller-manager-metrics-service created
deployment.apps/news-operator-helm-controller-manager created
Ideally, again an instance of the Local News application has been installed in the localnews-operator project, and now your custom controller runs in the news-operator-helm-system project. Here you find also the logs about what your operator is actually doing. E.g. you’ll find Reconciled release in those logs, when you delete resources of your application.

Making our Operator available for OLM
The operator runs in our cluster and it manages the deployment and configuration of instances of our Local News application. So we are done, aren’t we? Of course, we are not! If our operator manages our application, who installs, manages, and upgrades the operator and even other operators themselves? This is where the Operator Lifecycle Manager (OLM) comes into play.
The OLM is responsible for publishing the operators to OpenShift via catalogs, updating operators, and checking their compatibility with OpenShift and other installed operators. OpenShift provides a nice user interface as you might know from installing and configuring other operators from the OperatorHub that provides a collection of certified and community operators. In order to make our operator manageable by the OLM, we need to package our operator into a standardized format called “bundle”. The ingredients for the bundle can be generated using the bundle subcommand with our make command. Please make sure to replace the IMG variable to point to your image registry if you want to follow along the steps with your own images. This will, moreover, only work if you also followed along with your own registry in the previous steps. You can also skip this and go ahead with our pre-built images.
make -C k8s/operator/news-operator-helm bundle IMG=quay.io/k8snativedev/news-operator:0.0.1-openshift
Display name for the operator (required): > Local News Operator
Description for the operator (required):> This is an operator to manage Local News applications
Provider's name for the operator (required): apress.com
Any relevant URL for the provider name (optional): apress.com
Comma-separated list of keywords for your operator (required): news, nlp, rss
Comma-separated list of maintainers and their emails: [email protected]

INFO[0001] Creating bundle.Dockerfile
INFO[0001] Creating bundle/metadata/annotations.yaml
INFO[0001] Bundle metadata generated successfully operator-sdk bundle validate ./bundle
INFO[0000] All validation tests have completed successfully
After running this command, you will discover that there is a new folder called bundle in your operator folder. The next step is to build a container image and push it to a registry.
make -C k8s/operator/news-operator-helm bundle-build bundle-push BUNDLE_IMG=quay.io/k8snativedev/news-operator-bundle:v0.0.1-openshiftBesides the bundle, the OLM needs an index of all your bundles available to install. This is called a catalog and is again an image that must be built and stored in a registry. To build the catalog from a set of bundles, we must specify the bundles in the BUNDLE_IMGS variable. We only have one bundle so far, so we execute the following command:
make -C k8s/operator/news-operator-helm catalog-build catalog-push CATALOG_IMG=quay.io/k8snativedev/news-operator-catalog:0.0.1-openshift BUNDLE_IMGS=quay.io/k8snativedev/news-operator-bundle:v0.0.1-openshift If you don’t want to run these steps yourself it is fine. You can just use our pre-built images from our quay.io/k8snativedev repositories. In the next step, we will make our operator available to the Operator Hub. But before that, let’s clean up again.
oc delete -f snippets/ocp6-operator/localnews.yaml
oc delete project localnews-operator
make -C k8s/operator/news-operator-helm undeploy IMG=quay.io/k8snativedev/news-operator:0.0.1-openshiftCode language: JavaScript (javascript)
Operator Hub
To add the operator to the Operator Hub of OpenShift we need to make the operator catalog image that we have built before available via a CatalogSource resource:
kind: CatalogSource
metadata:
  labels:
    olm-visibility: hidden
    openshift-marketplace: 'true'
  name: localnews-operators
  namespace: openshift-marketplace
spec:
  displayName: Localnews Operator Catalog
  grpcPodConfig:
    nodeSelector:
      kubernetes.io/os: linux
      node-role.kubernetes.io/master: ''
  icon:
    base64data: ''
    mediatype: ''
  spec:
  sourceType: grpc
  image: quay.io/k8snativedev/news-operator-catalog:0.0.1-openshift
  publisher: apress.com
  updateStrategy:
    registryPoll:
      interval: 30m
Code language: JavaScript (javascript)
We create the CatalogSource resource which will create a pod that runs our catalog image in the open shift-marketplace project:
oc apply -f snippets/ocp6-operator/localnews-catalogsource.yaml
When the pod is ready the CatalogSource shows Status: READY. Now we are ready to find our operator in the Operator Hub. Navigate to the Hub in the Administrator perspective and search for Local News.

You can now install it as you might already know from installing other operators from the Operator Hub.

We recreate our localnews-operator project and select it as the project to create the LocalNewsApp to get an example from our values.yaml.

We replace the domain with our OpenShift base domain and create the resource. We will see the status of the CR and find the deployment status.

And in the project we have deployed the application to, we will see our application depicted by the logo of our operator.

Conclusion
This article concludes our 4-part blog series on how to move your vanilla Kubernetes application to OpenShift and how it helps you get more secure, benefit from many UI and CLI integrations that OpenShift built on-top of Kubernetes and, last but not least, receive enterprise support for running your application but also for many of the tools involved in the lifecycle of your application. Specifically, in the final part we saw how it makes also packaging and distributing your application much easier leveraging the operator concept.
Authors
Benjamin Schmeling
Benjamin Schmeling is a solution architect at Red Hat with more than 15 years of experience in developing, building, and deploying Java-based software. His passion is the design and implementation of cloud-native applications running on Kubernetes-based container platforms.
Maximilian Dargatz
I am Max, live in Germany, Saxony-Anhalt, love the family-things of life but also the techie things, particularly Kubernetes, OpenShift and some Machine Learning.
One reply on “Deliver: Publish your own Operator with Operator Lifecycle Manager and the OpenShift Operator Catalog (4/4)”
[…] Deliver: Publish your own Operator with Operator Lifecycle Manager and the OpenShift Operator Catalo…, […]