Introduction
I have created the game Quarkus GrumpyCat right after I have finished my book Getting GitOps because I wanted to have a better and nicer example to demonstrate the benefits of GitOps and Quarkus than just a simple PersonService. Quarkus GrumpyCat is a bit more complex, as it contains two micro services (cat-client and cat-server), a PostgreSQL database and a Kafka Broker, which will all be installed with one command as you can see in figure 1.

This blog post is all about setting up the demo and going through it. If you want to understand how it was developed, please have a look at the other posts here on this site.
What do I need to demo it?
First of all you do need an OpenShift installation with some Operators installed and enough free resources to go through the whole thing.
I am using Single Node OpenShift running on my Intel NUC9i7 with 64GiB memory and a 1TB SSD. OpenShift itself runs within a KVM virtual machine with 8-10 cores, 32GiB memory and a 120GB (virtual) hard drive assigned to it. This should be enough.
NOTE: In order to install Single Node OpenShift, you need at least 8 cores. Otherwise the installer does not work. Once OpenShift is installed, you might be able to assign less than 8 cores to it, as I barely use more than 4 cores for my complete setup.
The following Operators need to be installed in OpenShift in order to run the demo:
- OpenShift GitOps (ArgoCD)
- OpenShift Pipelines (Tekton Pipelines)
- CrunchyData Postgres Operator
- Strimzi Operator for Kafka
On the client side, you need to have the following software installed:
- Recent Chrome or Firefox (Safari should also work, but haven’t been tested too much)
- VSCode (or any other IDE, you like to use)
tknTekton command like toolsocorkubectlto interact with OpenShift via CLImavenand a Java development environmentkustomizeif you don’t want to useoc apply -k
And finally, you should have access to a container image repository such as quay.io .
How to setup and configure OpenShift
After installing OpenShift (either Single Node OpenShift, OpenShift Local or any other recent OpenShift version 4.10 and better), you should make sure that everything is set up correctly. You could use openshift-config for this.
First of all, you have to use oc to log into your cluster with kubeadmin or with a user with cluster-admin role:
$ oc login -u kubeadmin -p <pwd> https://api.cat4.ocp.lan:6443
Code language: HTML, XML (xml)
Then you can clone openshift-config to your local hard drive and execute the script:
$ git clone https://github.com/wpernath/openshift-config

$ cd openshift-config
$ ./config-snc.sh persistent-volumes
$ ./config-snc.sh registry
$ ./config-snc.sh operators
$ ./config-snc.sh create-users
Code language: PHP (php)
This will install the CSI kubevirt host path provisioner into your cluster, will make your registry Managed and able to store images, will install all required Operators and creates the following two users:
- User
adminwith passwordadmin123 - User
develwith passworddevel
After executing the last command, it takes a while until you’re able to log into your cluster with the user admin again.
NOTE: If you already have a cluster or you are using OpenShift Local, you must not execute the first two scripts, as both should already have persistent storage and the registry configured. Do this only if you’ve installed Single Node OpenShift and don’t have any Storage Class installed.
How to prepare the demo
If you want to show the complete demo, please fork the following two repositories from GitHub:
Then create your free user account in quay.io (or use your existing one in any other repository) and make sure to have your encrypted Docker CLI password for quay.io (or your preferred repository) available.
Then clone your fork of the source code repository to your local disk:
$ git clone https://github.com/<your-name>/quarkus-grumpycat
Code language: PHP (php)
Finally, you need to change the default repository names for GitHub and Quay in the pipelines. Use your preferred editor, like VSCode, and open the following files:
gitops/tekton/pipelines/build-server.yamlgitops/tekton/pipelines/build-client.yamlgitops/tekton/pipelines/stage-server.yamlgitops/tekton/pipelines/stage-client.yaml

In there you need to change most parameters so that they reflect your settings:
- spec.params.git-url
- spec.params.config-git-url
- spec.params.image-name
- spec.params.repo-username
In the stage-client and stage-server pipelines, you need to change the following parameters to suit your needs:
- spec.params.git-url
- spec.params.target-image

NOTE: Of course, you could also set those parameters on pipeline execution, but I have not implemented it so far, so that you need to change them before you’re installing the cat-ci namespace.
Finally, you need to install everything in a namespace called cat-ci. Best is to use the script gitops/tekton/pipeline.sh init ..., because this script is also installing all secrets you need to execute the pipelines later on.
$ ./gitops/tekton/pipeline.sh init --force \
	--git-user <your GitHub username> \
	--git-password <your github password> \
	--registry-user <your image repo user> \
	--registry-password <your image repo password \
	--argo-host <host of your argocd instance> \
	--argo-user admin \
	--argo-password <password of your ArgoCD instance>
This script will create the namespace and will install all pipelines and associated infrastructure components for you. Then you’re done and everything can be demonstrated.
How to demonstrate GrumpyCat
Now that you’ve configured your OpenShift Cluster and installed the demo, let’s have a quick look at Figure #4 to see which components there are in the game.

The upper part of the image shows the GitOps part of the demo, where the Developer is writing code and pushes the code to a Git repository. The Tekton based cloud native pipelines are cloning the sources and the config from the corresponding repositories to build the images (one for the client and one for the server) and then they are pushing the updated config to the Git repository and the images to the container image repository. From there on ArgoCD takes over the deployment of the game.
For this demo, we have all in all three different Kubernetes namespaces, which mimic the three stages for development and staging:
cat-devfor Developmentcat-stagefor staging and testing- and finally
cat-prodfor – well – production environment
ArgoCD updates the deployment whenever there are any changes in the Quarkus Config git repository for the given stage.
The Code Repository
First of all, let’s have a look at the source code repository of the game:
$ ls -l
total 120
-rw-r--r--   1 wanja  staff   2600 13 Jan 10:32 CONTRIBUTING.md
-rw-r--r--   1 wanja  staff  35149 13 Jan 10:32 LICENSE
-rw-r--r--   1 wanja  staff   6060  9 Feb 18:29 README.md
-rw-r--r--   1 wanja  staff    709 13 Jan 10:32 RELEASING.md
-rw-r--r--   1 wanja  staff   1907 26 Apr 20:48 docker-compose.yaml
drwxr-xr-x  11 wanja  staff    352 13 Jan 10:32 docs
drwxr-xr-x   5 wanja  staff    160 13 Jan 10:32 gitops
drwxr-xr-x   5 wanja  staff    160 13 Jan 10:32 kubernetes-config
drwxr-xr-x  12 wanja  staff    384 26 Apr 20:52 melonjs-client
-rw-r--r--   1 wanja  staff   2987 26 Apr 20:44 pom.xml
drwxr-xr-x  11 wanja  staff    352 26 Apr 20:51 quarkus-server
drwxr-xr-x  21 wanja  staff    672 13 Jan 10:32 tiled
The file docker-compose.yaml is used to install the game quickly on your local laptop. It just needs either podman-compose or docker-compose to be executed and installs the latest tagged version of the game.
The folder gitops contains two more folders. gitops/tekton contains everything to setup cat-ci namespace, as we’ve already done in an earlier section.
The folder gitops/argocd contains the ArgoCD Application objects for the 3 namespaces. If you want to install the game, simply install the files in there.
kubernetes-config contains a copy of grumpycat-config Git repository to install only the game in a namespace called grumpycat. If you just want to show how to easily install the game with one command, use
$ oc apply -k kubernetes-config/overlays/<your env>
Code language: HTML, XML (xml)
<your env> must be copied from one of the existing overlays before and then modified so that the Kustomize’d based ConfigMaps point to the right URL (see figure #5).

melonjs-client contains the complete source code for the JavaScript based client. The client code also runs on a Quarkus runtime, as it makes things like packaging and deployment much easier for me (as someone who is used to do the Maven build and not the JavaScript NPM way).
And finally quarkus-server, which contains the Quarkus based code for the server part.
The Config Repository
The quarkus-config repository now contains everything what is required for ArgoCD to deploy the three stages of the game in three namespaces. Please also clone your fork of the repository to your local SSD and change the file kustomization.yaml in config/overlays/dev, config/overlays/stage and config/overlays/prod to make sure, you’re going to use your own image names and URLs (Figure #6)

Other than that, the directory and file structure look similar to any other Kustomize configuration:
$ tree config
config
├── base
│   ├── client-depl.yaml
│   ├── client-route.yaml
│   ├── client-service.yaml
│   ├── deployment.yaml
│   ├── kafka-broker.yaml
│   ├── kafka-topic.yaml
│   ├── kustomization.yaml
│   ├── postgresql.yaml
│   ├── route.yaml
│   └── service.yaml
└── overlays
    ├── dev
    │   └── kustomization.yaml
    ├── prod
    │   └── kustomization.yaml
    └── stage
        └── kustomization.yaml

6 directories, 13 files
config/base contains all the files which need to be installed into a Kubernetes namespace. And the overlays/... folder contains what needs to be changed between the stages (image reference, configuration etc.)
The Installation
Now it’s time to install the game. This is done quite easily by simply executing
$ oc apply -k gitops/argocd
namespace/cat-dev created
namespace/cat-prod created
namespace/cat-stage created
rolebinding.rbac.authorization.k8s.io/cat-dev-role-binding created
rolebinding.rbac.authorization.k8s.io/cat-prod-role-binding created
rolebinding.rbac.authorization.k8s.io/cat-stage-role-binding created
application.argoproj.io/cat-dev created
application.argoproj.io/cat-prod created
application.argoproj.io/cat-stage created
This will create three namespaces cat-dev, cat-stage and cat-prod in the currently active Kubernetes context. It will then make sure that the ArgoCD application controller is able to do anything in those three namespaces by creating the necessary RoleBinding objects for the ServiceAccount and finally, it creates the ArgoCD Application objects, which tell ArgoCD where it is able to find the configuration and where to apply it (source Git config repository and target Kubernetes cluster).
This is all done by just having three Kubernetes manifest files and a kustomization.yaml to ease the installation:
❯ ls -l gitops/argocd
total 40
-rw-r--r--  1 wanja  staff  1439  5 Mai 14:28 cat-apps.yaml
-rw-r--r--  1 wanja  staff   131  5 Mai 14:42 kustomization.yaml
-rw-r--r--  1 wanja  staff   707  7 Feb 08:48 ns.yaml
-rw-r--r--  1 wanja  staff   913  5 Mai 14:28 roles.yaml
While ArgoCD is now instructing OpenShift to do the installation, it’s time to have a look at those files
apiVersion: v1
kind: Namespace
metadata:
  annotations:
    openshift.io/description: ""
    openshift.io/display-name: "DEV"
  labels:
    kubernetes.io/metadata.name: cat-dev
  name: cat-dev
spec:
  finalizers:
  - kubernetes
---
[...]
Code language: JavaScript (javascript)
ns.yaml contains the manifest to create the three namespaces.
apiVersion: rbac.authorization.k8s.io/v1
kind: RoleBinding
metadata:
  name: cat-dev-role-binding
  namespace: cat-dev
roleRef:
  apiGroup: rbac.authorization.k8s.io
  kind: ClusterRole
  name: admin
subjects:
- kind: ServiceAccount
  name: openshift-gitops-argocd-application-controller
  namespace: openshift-gitops
---
[...]
roles.yaml contains the manifest to create the RoleBinding for the ServiceAccount openshift-gitops-argocd-application-controller so that the ServiceAccount is allowed to update the corresponding target namespace.
apiVersion: argoproj.io/v1alpha1
kind: Application
metadata:
  name: cat-dev
  namespace: openshift-gitops
  finalizers:
    - resources-finalizer.argocd.argoproj.io
spec:
  destination:
    namespace: cat-dev
    server: https://kubernetes.default.svc
  project: default
  source:
    path: config/overlays/dev
    repoURL: https://github.com/wpernath/grumpycat-config.git
    targetRevision: HEAD
  syncPolicy:
    automated:
      prune: true
    syncOptions:
    - PruneLast=true
---
[...]
Code language: JavaScript (javascript)
cat-apps.yaml contains the ArgoCD Application objects to instruct ArgoCD to do the actual deployment of the application. It basically contains the wiring instructions for ArgoCD: „This is the config git repository and there is the target Kubernetes cluster, please do your synchronization job based on those options.“
The Game
After a short while, all three namespaces should be correctly installed and ready to be used.

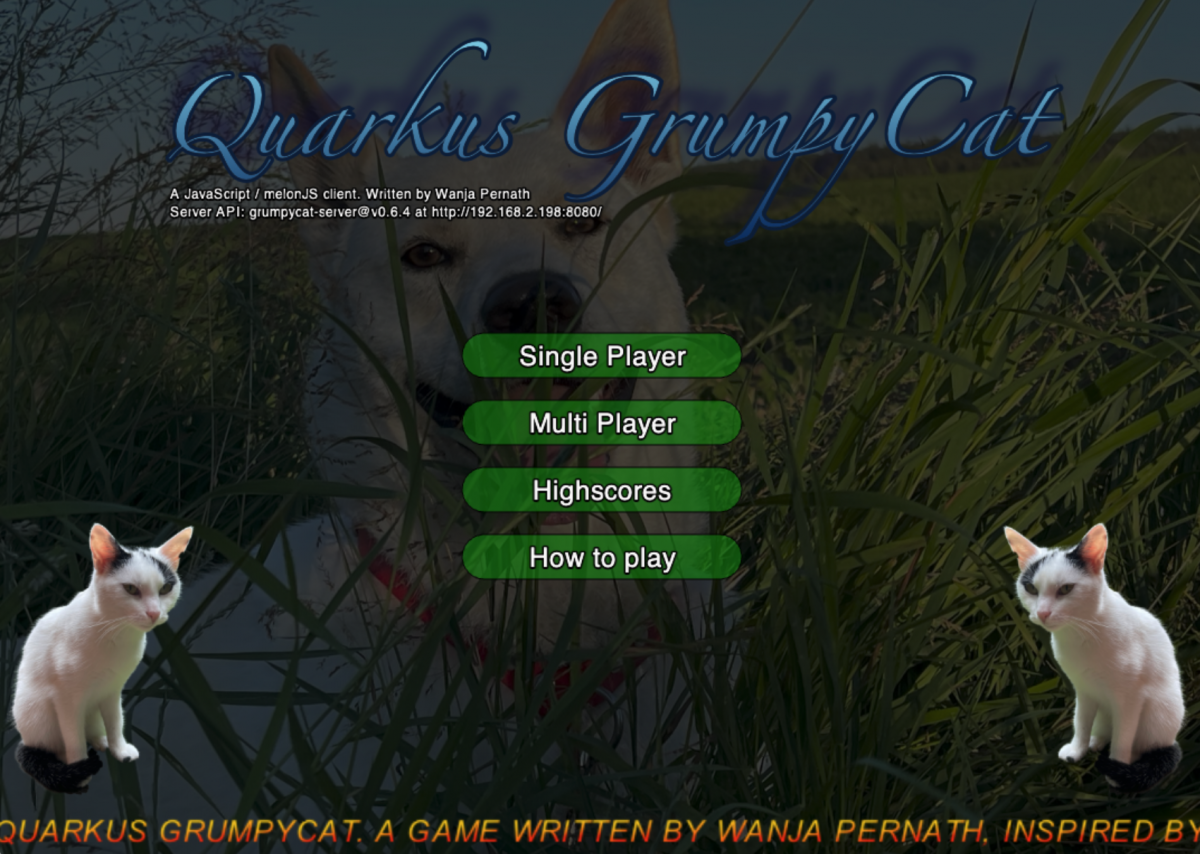
If you’re going to click on the link of the cat-client service, you should see the main screen of the game (Figure #8).

As single player, just click on – well – Single Player button, then on Play and click again on the Get Ready screen.

The game should start and you’re the dog and you need to make sure the grumpy cat does not touch you. Use arrow keys to move. With <left shift> key and an arrow key, you’re able to place a barrier where the cat can’t move over.
After you’ve collected one of the bombs, you’re able to place a bomb, which explodes after 5 seconds (so move away after placing). A bomb destroys all barriers in a 3×3 radius but is also stunning the cat for 5 seconds. In later levels or during multi player, you’re getting other weapons which are killing spiders, stunning golems and so on. Please look at the How to play in game screens for more help.


The Pipelines
Now let’s have a look at OpenShift Pipelines in the Developer Console in namespace cat-ci (Figure #12). There you should see quite a lot of pipelines, which are building and staging the client and the server respectively.

Click on the build-serverpipeline to see how it’s set up and explain how you could easily use the builder to change the pipeline and / or create your own one.

If you want to execute the pipeline, you have to use either the gitops/tekton/pipeline.sh script or you should directly use tkn. The reason is that I am using my own ServiceAccount for the build and right now it’s not possible to choose the ServiceAccount from the Action —> Start Pipeline command.
$ ./gitops/tekton/pipeline.sh build-server -u <your image repo username> -p <your image repo password>
Code language: HTML, XML (xml)
If you don’t want to use the script (or can’t, because you’re not using MacOS / Linux), then you have to issue tkn command directly:
$ tkn pipeline start build-server -s pipeline-bot \
            -p repo-password=$IMAGE_PASSWORD \
            -p git-revision=$GIT_REVISION \
            -w name=source,claimName=builder-pvc \
            -w name=maven-settings,config=maven-settings \
            --use-param-defaults
Code language: PHP (php)
$IMAGE_PASSWORT is the password for the container image repository. And $GIT_REVISION is the branch you would like to use. Please use release-v0.6.x here, until I was able to merge this branch into the main one.
The pipeline for building the client is being called exactly like the one for building the server service.
Those pipelines are building the source code, building the container image, storing the image into the container image repository and are updating the Git repository for the configuration of the dev stage.

The corresponding stage-server pipeline is creating a test release for the staging stage. The pipeline is cloning the config repository, is looking for the latest container image ID of the dev stage and is creating a branch called release-<your release name> in the config repository. It is also using skopeo to tag the container image with the name.
There are no Tasks in the pipelines, which are doing a deployment of the updated images on OpenShift. This is the job of ArgoCD, which we are going to discuss in the next paragraph.
Doing GitOps
We are using the default OpenShift GitOps ArgoCD instance for demonstrating GitOps. However, there are plans to instantiate an own ArgoCD instance and place it in the cat-ci namespace. But for now, we are using the default instance.
If you want to open the ArgoCD instance, you need to get the URL and the admin password of the default user. Open a shell, log into OpenShift via oc and execute the following command to get the URL of the default ArgoCD instance:
$ echo https://$(oc get route openshift-gitops-server -ojsonpath='{.spec.host}' -n openshift-gitops)
Code language: PHP (php)
And to get the password, you can execute the following command:
$ oc get secret openshift-gitops-cluster -n openshift-gitops -ojsonpath='{.data.admin\.password}' | base64 -d
Code language: PHP (php)
Now execute the build pipelines, wait until everything was done and have a look at ArgoCD to see if your changes have been processed. Do the same with the staging pipelines.
Finally, have a look at Quay.io and GitHub to see what has changed during build and stage processes.
Summary
This demo shows you how you’re easily able to install even complex applications in a Kubernetes cluster. And it shows how you’re able to easily setup and use the GitOps paradigm to develop your applications.
Thanks for reading. And enjoy the game!