In the year 2023 we celebrate the 10th anniversary of Docker and the 9th anniversary of Kubernetes. Container technology has now become mainstream. But recent advances in the Podman ecosystem prove that innovation in the container world is still happening at a strong pace. Podman 4 was released in February 2022 and brought considerable improvements in various areas, notably an extensive rewrite of the network stack, better support for volumes (especially when using podman machine on Windows and Mac), and various enhancements of a feature that makes it possible to start and stop pods and containers on the basis of a standard Kubernetes YAML resource description. If you are new to Podman or would like to get a comprehensive update about all its features, I highly recommend the brand new book Podman in Action by none other than Daniel Walsh, Red Hat’s authority on the subject of container security and the mastermind behind the Podman project.
Another exciting event in the past months was the release of Podman Desktop, a project which strives to provide a fully featured open source alternative for Docker Desktop. We shall have a brief look at Podman Desktop further below.
In this article we shall explore some aspects of Podman which are often difficult to understand for new adopters, especially when coming from Docker, namely multi-container applications in a rootless context. It is important to stress that when we say ‘rootless’ here, we actually mean two different things at once:
- podman and the container runtime run as a normal user, and not as root
- the user of the process running inside the container is not privileged
Explaining in detail why these attributes are virtuous ones goes beyond the scope of this article, but needless to say, it is a far more secure option. While being absolutely mandatory for running containers in production on a Linux server, the rootless approach is nowadays likewise considered a best practice and highly recommended for any local development environment.
Multi-container apps
Modern applications are no longer self-contained monoliths but are shipped as individual micro-services, which can have complex dependencies to each other. A frontend app might for instance rely on one or more backends, a database, a cache, a message broker, an identity provider, etc. It can be quite daunting to successfully run each of them in individual containers with Podman from scratch. In the early days of Docker, even when most of us had never heard of Kubernetes, we soon came to appreciate the convenience and level of abstraction that the Compose Spec offers: a single YAML format to declare all services of a multi-container app. The good news are:
- This approach still works with Podman, with either Docker Compose or Podman Compose.
- The migration from Compose to Kubernetes YAML can be automated. This will be explained further below.
Network communication between multiple containers
First let’s explore how to achieve network communication between containers or pods in a rootless environment.
Intra-pod communication
The easiest approach is to run all containers that need to communicate to each other in the same pod, without doing anything special with the network, as it will just work with the default one:
podman pod create --name mypod
podman create --name container1 --pod mypod image1
podman create --name container2 --pod mypod image2
podman pod start mypodCode language: Bash (bash)
which can likewise be written more concisely as:
podman create --name container1 --pod new:mypod image1
podman create --name container2 --pod mypod image2
podman pod start mypodCode language: Bash (bash)
In the above example, as both containers are running in the same isolated Linux context, if container1 exposes, say, port 8088, then it will also be accessible in container2 from localhost.
To illustrate this with concrete examples, let us create our own container image with a simplistic application written in Go that depends on a Redis database.
First create a go.mod with this content:
module opensourcerers.org/demo

go 1.19

require (
	github.com/go-redis/redis v6.15.9+incompatible
)Code language: Go (go)
and a file main.go in the same folder with this code:
package main

import (
	"fmt"
	"log"
	"net/http"
	"os"

	"github.com/go-redis/redis"
)

func main() {
	// Create Redis Client
	var (
		host     = getEnv("REDIS_HOST", "localhost")
		port     = string(getEnv("REDIS_PORT", "6379"))
		password = getEnv("REDIS_PASSWORD", "")
	)

	client := redis.NewClient(&redis.Options{
		Addr:     host + ":" + port,
		Password: password,
		DB:       0,
	})

	_, err := client.Ping().Result()
	if err != nil {
		log.Fatal(err)
	}

	http.HandleFunc("/", func(w http.ResponseWriter, r *http.Request) {
		cmd := client.Incr("VISITORS")
		fmt.Fprintf(w, "Hello, you've requested: %s\n", r.URL.Path)
		fmt.Fprintf(w, "You are visitor number %d\n", cmd.Val())
	})

	http.ListenAndServe(":8080", nil)
}

func getEnv(key string, defaultValue string) string {
	value := os.Getenv(key)
	if value == "" {
		return defaultValue
	}
	return value
}Code language: Go (go)
Even if you are not a seasoned Golang programmer (which I certainly am not), you can probably see that we have a simple webapp that returns a “hello world” kind of response, with a counter value retrieved from Redis, akin to the webpages of the 1990s.
Let us now build the image in two stages with the following Containerfile:
## Build stage
FROM registry.access.redhat.com/ubi8/go-toolset as builder
WORKDIR /app
USER root
COPY . .
RUN go mod download
RUN CGO_ENABLED=0 GOOS=linux go build -a -installsuffix cgo -o main .

######## New stage #######
FROM registry.access.redhat.com/ubi8/ubi-minimal
WORKDIR /app
COPY --from=builder /app/main .
EXPOSE 8080
USER 1001
# Command to run the executable
CMD ["./main"]Code language: Dockerfile (dockerfile)
Let’s build the image:
podman build . -t go-helloCode language: Bash (bash)The build might take a while to complete. When finished, we can check that the image is locally available with:
$ podman images | grep go-hello
localhost/go-hello         latest            36b3a8763698  2 hours ago    101 MBCode language: Bash (bash)
For Redis, we use the standard image from docker.io/redis/redis-stack but we could as well have used an equivalent image from registry.redhat.io, such as rhel9/redis-6. To run our app with both containers in the same pod, we can create a pod for Redis where we take care of port-forwarding, create the hello container in the same pod, and then start the pod:
podman create -p 8080:8080 --name redis --pod new:hello-pod redis/redis-stack
podman create --name hello --pod hello-pod go-hello
podman pod start hello-podCode language: Bash (bash)
We can verify that communication is working without specifying the environment variable REDIS_HOST, as the go-hello container can access the Redis port 6379 on localhost:
$ curl localhost:8080/foo/bar
Hello, you've requested: /foo/bar
You are visitor number 1
If we repeat the command multiple times, the visitor counter will be incremented. Side-note: If we open the same url in a browser, the counter will increment in steps of 2. This is because the browser does two queries each time it visits a new host, one for the URL itself, and another for favicon.ico, which is also handled by our web app! This can be easily fixed by tweaking the Go handler, but this would go beyond the scope of this article.
Container to container communication via IP
Another approach is to use the internal IP address of a container. Be aware that in a rootless podman, containers do not actually have real IP addresses: this is only possible with rootful containers. But the default network mode slirp4netns or the newer CNI-less network stack netavark (available in Podman 4) will nevertheless take care of simulating a network interface in the userspace and expose an IP address. We can obtain the IP address of a running container with:
podman inspect container_name -f '{{ .NetworkSettings.IPAddress }}'Code language: Bash (bash)Our app can be run as two separate containers (one for redis, the other for the Go app itself) with the following script:
#!/bin/bash
podman run -d -p 6379:6379 --name redis redis/redis-stack
REDIS_IP=$(podman inspect redis -f '{{ .NetworkSettings.IPAddress }}')
# Handle case when REDIS_IP is empty:
if [ "${REDIS_IP}" = "" ]; then
    echo "The internal IP of the redis container is empty!"
    podman stop redis
    podman rm redis
    exit 1
fi
podman run -d -p 8080:8080 --name hello \
    -e REDIS_HOST=${REDIS_IP} localhost/go-helloCode language: Bash (bash)
Container to container communication via DNS
Podman also supports DNS, which by default is not enabled with the podman network. We can check which networks are available with:
podman network lsCode language: Bash (bash)On my Macbook with podman v4.3.1, the installation automatically provides a network named podman-default-kube-network for which DNS is enabled. But it is also possible to create a new network from scratch with:
podman network create mynet1Code language: Bash (bash)which by default will enable the DNS feature. To ensure this is indeed the case, we can type
podman network inspect mynet1 -f {{.DNSEnabled}}Code language: Bash (bash)which should return true. Let’s see how this works in practice. Continuing with our above example, we first create a container for Redis and connect it to this network while also providing an alias name for DNS resolution. The container can be started with:
podman create -p 6379:6379 --name redis \
    redis/redis-stack
podman network connect mynet1 \
    redis --alias=redis
podman start redisCode language: Bash (bash)
Our hello service is then able to communicate with the redis container using the above alias as hostname:
podman run -d -p 8080:8080 --name hello \
    -e REDIS_HOST=redis \
    --network mynet1 \
    localhost/go-helloCode language: Bash (bash)
Pod to pod communication via DNS
We have seen at the beginning that when both containers are running in a single pod, communication is possible via localhost. But what if each container is running in a separate pod? For sure, here too DNS resolution is possible. The technique however is a little different from the one we applied previously. We need to specify a network for which DNS is enabled via the --network parameter and also to provide a hostname for the pod via --hostname:
podman run -d -p 6379:6379 --name redis \
    --pod new:redis-pod --hostname redis-pod \
    --network=mynet1 redis/redis-stack
podman run -d -p 8080:8080 --name hello \
    --pod new:hello-pod -e REDIS_HOST=redis-pod \
    --network=mynet1 --hostname hello-pod \
    localhost/go-helloCode language: JavaScript (javascript)
So far we have seen that Podman provides various means to ensure network communication between containers. Podman provides a rich toolbox that makes it possible to set up multi-container apps, but this can quickly become rather complex. There are situations where mastering the low-level subtleties of Podman is useful and meaningful, and the above examples only demonstrate some of the possibilities. But this complexity comes with a price, and, as we have already mentioned, developers usually prefer more abstract, declarative approaches such as Docker Compose or Podman Compose. Both tools work very well with recent versions of Podman. Under the hood, the Compose tools use the internal REST API of Docker or Podman to do the equivalent of what we have achieved above with command line operations. My recommendation would be to use Podman Compose, as it relies on the native Podman API instead of its Docker compatibility layer. Any of the examples provided in the awesome-compose Github repository can be used to prove ourselves that they work perfectly fine also with Podman (leaving aside potential issues with references to public images that are designed to run as root only).
Compose is nice, but what if our requirements become more complex and we need to orchestrate our containers by means of a more sophisticated platform? Is there a way to deploy our app built from low-level podman commands or from a good-old Compose YAML to Kubernetes or OpenShift? Fortunately, the answer is yes: Podman comes with a helper tool that automates this task.
Creating Kubernetes YAML from running containers
Podman makes it possible to generate a Kubernetes Pod resource description at runtime for each running container. The podman generate kube command takes the name or id of the container as argument. Its output can be saved as YAML files and used to ‘replay’ the state of our app with the command podman play kube. Of course the same YAML can also be used to deploy to a Kubernetes or OpenShift cluster. If we have many running containers and would like to save each resource description to a single multi-object YAML, we can use the following script:
for name in $(podman ps --format "{{.Names}}");
    do podman generate kube $name
    echo "---"
done > play.yamlCode language: Bash (bash)
Optionally we can also include a Service description together with each Pod by adding the --service flag to the podman generate kube command. Interestingly, Podman even supports the Deployment resource (including replicas!), though it is not yet able to generate it.
Caveat: in our examples the REDIS_HOST environment variable was either the internal IP of the redis container, or some hostname to be resolved, depending whether the container runs on its own or as part of a pod. The execution of podman play kube, unsurprisingly, will create a pod instance for each Pod resource declared in the YAML, and the communication between containers will be achieved via the hostname of the pod, following the pattern we applied before. This means our redis pod will automatically be provided with a property Hostname having a value redis-pod. Before we can ‘play’ our app, we might thus need to adjust our environment variable in the YAML file accordingly:
  - env:
    - name: REDIS_HOST
      value: redis-pod # changed from 'redis'Code language: YAML (yaml)
Before testing it, we should first stop and remove the running container(s) from which it was created. Assuming the result was saved to a file play.yaml, we are then ready to ‘replay’ it with this command:
podman play kube play.yamlCode language: Bash (bash)Again, we can test that the app is running as expected with curl localhost:8080. To stop and remove the pods, we simply use:
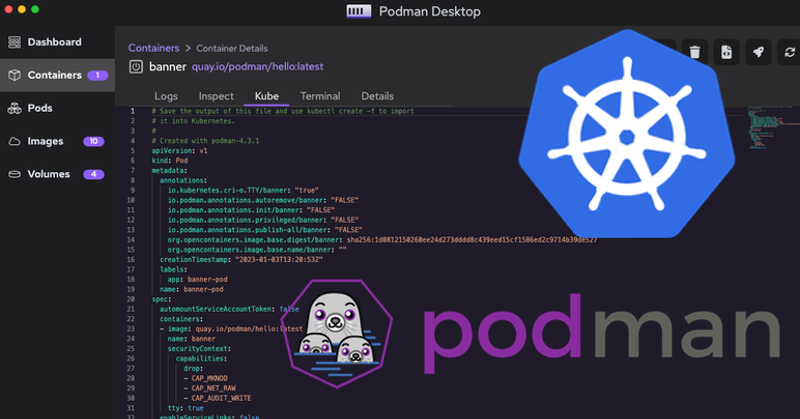
podman play kube play.yaml --downCode language: Bash (bash)Users of Podman Desktop can also easily achieve the above steps by using its graphical user interface. For any running container, under the details view, we can generate the equivalent Kubernetes YAML simply by clicking on the ‘Kube’ tab:

For any running pod, the same functionality is available under Pods > Pod Details:

Once we have saved our Kube resource(s) to a YAML file, we can recreate the same state by clicking, under the Pods menu, on the ‘Play Kubernetes YAML’ button:

In the next step we can select our YAML file and start the underlying pod(s). Currently there is no single button for stopping a Kubernetes YAML, but this can be easily done by selecting all pods we want to stop or remove and press the stop or delete icon. As an additional goodie, Podman Desktop also provides a button for deploying directly to a Kubernetes cluster that is known in our local context.
That’s it! I hope you have enjoyed our exploration of multi-container apps with rootless Podman.
Useful Links
Podman
- Introduction to Podman
- Daniel Walsh, Podman in Action, Manning, December 2022, ISBN 9781633439689, 312 pages (Early Access Ebook via Red Hat Developers)
- Basic Setup and Use of Podman in a Rootless environment
- Shortcomings of Rootless Podman. See also this interesting example.
- Basic Networking Guide for Podman
- Matthew Heon: Podman 4.0’s new network stack: What you need to know (Enable Sysadmin, 17 March 2022)
- Alexon Oliveira: How Podman can extract a container’s external IP address (Enable Sysadmin, 21 January 2022)
- Podman dnsname plugin
- Podman Compose
- https://podman-desktop.io/docs/podman-compose
- Kevin Degeling: Docker and Fedora 37: Migrating to Podman (Fedora Magazine, 2 January 2023)
Podman Desktop
- Podman Desktop Documentation
- Mithun T. Dhar: Advancing the next phase of container development with Podman Desktop (Red Hat Blog, 25 October 2022)
- Stevan Le Meur & Tim deBoer: Podman expands to the Desktop (Red Hat Developer, 24 October 2022)